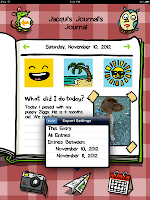
Pages

Friday, 23 November 2012

Motivating writing using Apple Mac's Keynote

I was playing around with photos with a teacher today and showing her how to do masking and Alpha masking. When you do the alpha masking you need a fairly plain background.

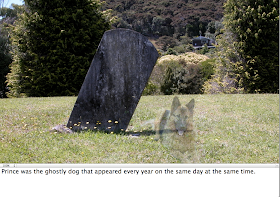
I used this photograph of my dog and then removed the background green of the grass by clicking on the Alpha button on the toolbar.


Then I dragged another photo of scenery (a photo I took at Cooks Beach) on top of the dog and sent the background to the back.


The next step was to click on the dog and change the Opacity so he looks ghostly.


I then went to View - Show Presenter notes and now students can write their stories about the picture.


Take a screen capture of the photo and add it to a Presentation in Google Docs. Make a file up different pictures.

Wednesday, 14 November 2012

Collaborating with multiple iPads using Reflector


Pages ($13.99 for iPhone/iPod Touch and $13.99 for iPad)
Wordprocessing Software


Reflection ($14 for Mac or Windows)
Mirroring software for you laptop


I was working with some Year 7 and 8 students at 'The Gardens' school and they were getting ready to storyboard their iMovie Trailers.
Their teacher 'Anna' had emailed them the iMovie Trailer Storyboard PDF which we had sourced from Timothy Jeffferson's blog. The students took screen captures of the PDF and then pasted into Pages. They then used the text boxes to add their information.
So in a group of four
  • One student was filling in the PDF storyboard
  • Another student was filling in the iMovie trailer headings
  • Two students were just sitting there
They were not really working together anymore as they were more involved in their own little projects.
I had Reflector on my laptop so I hooked my computer up to the projector, launched Reflector and then showed the girls how to use the Airplay on their iPads to mirror to the projector.
menubar.png Mirror your iPad by tapping on the Air Play button button.png and select the name of the laptop and turn Mirroring on.


The whole dynamics of the group changed with all four students able to see what each other was writing and their group became more collaborative.
Later they added another iPad where one of the girls typed up a list of what they needed to do next.

There was a great discussion buzz coming from them.
They said they preferred working like that as they could easily see what everybody was writing.


Saturday, 10 November 2012

Starting younger children reflecting

Kids Journal ($1.29 for iPad)
Diary writing, reflective journal for young students.


This is a great app to start young children reflecting on their day. It can be used for  for individual iPad owners and you can set up class sets of journals on one iPad.


Tap on the empty Journal box to add a new journal.
Add a photo, type in your name and choose a colour for your book.


Choose a Mood Picture
Choose a location picture


Choose a weather picture
Choose the 'Photo of the day'
Type in your reflection/journal/diary entry


These pages can be exported by tapping on the Paper Dart icon. They can be exported to iBooks, Kindle, Notability, Evernote and several more.


So it takes 5 steps to make a Journal entry
  1. Choose a mood
  2. Chose a location
  3. Choose the weather
  4. Choose a photo
  5. Type in your entry
The next step could be Kidblog which is an Internet based student blogging platform and which is now available as an app
Kidblog (Free for iPhone/iPod Touch; Free for iPad)


And then there is Blogger, if your students have a Google account through Google Apps for Education then they have a 'Blogger' account. It is a great way for students to blog as there are no distractions on the app, all they can do is type a title, type a post, insert a photo and post!

5 year old Chloe, doing her favourite thing...blogging on Blogger

    Thursday, 1 November 2012

    Tools we have used before and forgot about #1

    Telescopic Text
    I blogged about this back in  October 2009 and posted on my Literacy wiki a couple of years ago. Telescopic text is a great way of showing students how to expand their sentences. The original Telescopic text starts off with a sentence, click on a shaded word to see how it expands.

    You can now make your own Telescopic text, and/or you can also have an account where you can save them and return to them later.
    These would work well as an IWB activity where groups of children can collaborate on one piece of writing. Or if you have access to several computers, students can be independently writing their own and sharing their different stories later, which could possibly be further edited.

    Yesterday I was working with a teacher and we were thinking about different ways to make a student's reading experience more fun and interesting and then to link it into his writing. The following poem was part of the story she was going to use with him from a Junior Journal (Junior Journal 36, Dancing Bees by Lynette Bradley.) and it is perfect for enlarging and adding to.

    So here is a tool that you should add to your 'Teacher Digital Toolkit'.

    Thursday, 18 October 2012

    Your photo jigsaws on iPad, iPod Touch, wikis and blogs

    A great way to start off and introduce your wiki/blog at the beginning of the year is to add a jigsaw using photos of your students or places around the school. Jigzone allows you to upload your own photos and embed jigsaws into your wikis and blogs. (It will not embed into Google Sites).
    The jigsaws will also work on your iPad or your iPod Touch.
    • set up an account at Jigzone
    • Click on 'New to Jigzone'
    • Click on Add Photo (Make sure that the photo is smaller than 1 megabyte)
    • Click Browse, find the photo and then click Upload 
    •  Click Embed/Link
     Choose how many pieces you want the jigsaw to end up as


    Embed in Blogs
    Select Fixed size for Blogs, click in the html box and copy the code.
    Go back to your blogger page, click where you want the jigsaw to go, click on the HTML button next to compose, paste code, click back on Compose, add a label to the right, click Publish


    Embed in Wiki
    Scroll down to Stretch to Fit. Click in the html box and copy the code. Go back to your wiki page, click Edit, click where you want the jigsaw to go, click on Widget, click Other, paste in code, click Save and click save again to save the whole page.


    How can I use this with an iPad or an iPod Touch?
    Go to Safari and enter your blog or wiki address, tap on the Share button and select Add to Home Screen.

    Now you have a direct link to your blog or wiki.

    You might want to consider setting up a Jigsaw blog or a Page on a wiki.
    Ideas for photo jigsaws
    • kids in the playground
    • class trips
    • favourite areas of the classroom
    • kids learning in the classroom
    • pose a question and have a photo of the answer
    • spelling words jigsaw


    Sunday, 7 October 2012

    Junior Digital Toolkit for Writing

    There are so many digital tools available to students.
    How can you manage them?
    Which is the best tool?
    How can we share them out?
    How can we remember to use them?

    I have talked a lot about the necessity of students having their own 'Digital Toolkit'.
    • They need to know what is available 
    • They need to know 'how' they can use this toolkit
    They need to be able to make choices for their own learning! This is all part of building up self management and collaboration skills.
    The diagram below shows an example of an overall 'Junior Digital Toolkit'.
    There are 3 main digital tools
    • Laptop
    • iPad/iPod Touch
    • Easi Speak
    Now the students need to know how they are going to use these. With the laptop I have itemised the different uses and what software application they will use with it
    Writing stories - Kidspiration or Pages
    Playing Games -Wiki
    Make Movies - iMovie


    And then I have done the same with the iPad/iPod Touch

    Writing stories - Notes or Pages
    Drawing - Create a draw
    Making Music - Garageband

    As the students progress and become more proficient, I would add more software and apps tools until they have a wide selection and choice about what they could use.

    Now let's put this into practice. Below is the Writers Digital Toolkit at the beginning of the year

    Students are clearly able to see what their choices are for when Drafting and Publishing.
    As the year moves on,  more apps, software and online tools can be added.


    There needs to be a monitoring system put in place to see what students are using. For very young children I might have a Sticker chart.


    For older, more independent students I would have individual Check lists that are either kept in a Clearfile folder or as a Google Doc.
    Putting management techniques such as this in place teaches students to be independent, collaborative and self managing. Students need to know what is available for them to use and that they have a choice in the way they want to learn.

    Thursday, 30 August 2012

    Turning your Print outs into Interactive Google Doc templates

    I was working with Neil today who has a lot of Graphic Organisers, writing and reading templates that he prints out for his students. He wanted to know how he could 'recreate' them in Google Docs. When I looked at them most of them were in Word so could be uploaded straight to Google Docs and with a little tweaking make them more interactive.

    He had also made some templates in Comic Life.
    I suggested taking a 'screen capture' of these templates and paste into a Drawing box on Google Docs
    Mac: Shift - Control - Command- 4 (click and drag around the part you want to copy)
    Win: Open Snipping Tool (click and drag around the part you want to copy) click Copy
    Go to your Google Doc
    Go to Insert - Drawing
    Ctrl- V or Command- V to paste
    Tip: if it doesn't paste into the Drawing window, save and close and paste onto the Google Doc. Copy it again Ctrl - C or Command - C then go back into the Drawing Window and paste


     Students can then use the Drawing tools to add text boxes, change fonts, styles and colour, draw their own graphics in the Draw window or paste in graphics drawn in another programme.
    This template is available in the Public Template Gallery if you search for 'Narrative Story Web'.

    Wednesday, 29 August 2012

    Book reviews in Google Docs

    This post has been cross posted from iPads, iPods and Devices in Education

     I was asked to work with some Year 2 and 3 children today on writing book reviews. They had read the story on the school Kindles or the Kindle app on the iPad.
    e-Books can be purchased from Amazon

    Geronimo Stilton 'Lost Treasure of the Emerald Eye'

    They had discovered how they could write notes.
    I saw this as a great opportunity for writing notes myself and leaving 'Think about' questions and comprehension questions on pages for students to look at while reading the book. Students can then add their answers to the note and all of the group can share their understandings through the note feature.

    All of these children have Google app accounts so I made a Google Doc template for them to work from. They used computers for the Google Docs as the Drawing elements cannot be edited on an iPad.

    We talked about the book and some of the features of the story  and then I showed them the template I had shared with them. I took a couple minutes explaining how they could access the different embedded draw items and then we discussed what 'Synopsis, Review and Character Descriptions were.
    I had intended them to use the Google Draw tools for their book cover but as we had access to iPads we used the Free version of Crayola Paint and Create. They drew their pictures and emailed them to themselves and then we pasted them into the Draw box. They then used the Google Draw tools to add their Book titles and Author names.
    Below is Charlotte's work.

    A lot of today's session was about getting used to writing and editing in the Google Doc. There was a lot of sharing of ideas and 'how to do things' amongst the group. The next time we work on this template with a new book we will look more closely at the content the students write.

    Book Reviews with iPads and Google Docs

    I was asked to work with some Year 2 and 3 children today on writing book reviews. They had read the story on the school Kindles or the Kindle app on the iPad.
    e-Books can be purchased from Amazon

    Geronimo Stilton 'Lost Treasure of the Emerald Eye'

    They had discovered how they could write notes.
    I saw this as a great opportunity for writing notes myself and leaving 'Think about' questions and comprehension questions on pages for students to look at while reading the book. Students can then add their answers to the note and all of the group can share their understandings through the note feature.

    All of these children have Google app accounts so I made a Google Doc template for them to work from. They used computers for the Google Docs as the Drawing elements cannot be edited on an iPad.

    We talked about the book and some of the features of the story  and then I showed them the template I had shared with them. I took a couple minutes explaining how they could access the different embedded draw items and then we discussed what 'Synopsis, Review and Character Descriptions were.
    I had intended them to use the Google Draw tools for their book cover but as we had access to iPads we used the Free version of Crayola Paint and Create. They drew their pictures and emailed them to themselves and then we pasted them into the Draw box. They then used the Google Draw tools to add their Book titles and Author names.
    Below is Charlotte's work.

    A lot of today's session was about getting used to writing and editing in the Google Doc. There was a lot of sharing of ideas and 'how to do things' amongst the group. The next time we work on this template with a new book we will look more closely at the content the students write.

    Thursday, 23 August 2012

    Turning a Projector into Learning Centre activity with Juniors

    Continuing with using PowerPoint or Keynote in a different way, I was working with a teacher in a school that has intermittent internet access, 2 computers that work sometimes, and she has a projector that she uses in a limited way.
    I suggested using the Projector and her laptop as a learning centre activity area. I showed her that she could adapt some of her printed activities for visual interactive learning by creating them in PowerPoint or Keynote as the example below shows.


    Students can go to the centre and use Whiteboard markers to write the letters, a buddy can check to see if they are right, another child can move the slides with the arrow key on the keyboard. And the teacher can keep an eye on what the students are doing because it is on the Whiteboard through the projector. You are now making use of technology with students in control!

    Friday, 17 August 2012

    Do all students need to present their work in the same way?

    Do students need to all present their work in the same way?
    I constantly hear 'Your task is to make a PowerPoint!'
    So everybody does the same type of PowerPoint.

    Title................................................Text.........................................Picture

    And yes there are lots of online options for teachers and students but there are still a lot of teachers who are not ready or not able to make the leap into online publishing. So if we are going to 'Do' PowerPoint (or Keynote) then let's give them choices within that programme.
    The slideshow below is an example I made for a school when they said that the students assessment was to make a PowerPoint about what they know about Dinosaurs, this slideshow gives students different ways to publish within PowerPoint or Keynote.


    So when you are setting up publishing options, use some of the different ways to publish within PowerPoint or Keynote. Give them these options
    • Pictures tell the story (a series of pictures with the odd slide summing up  the pictures so far)


    • Pictures with no text, (telling the story with pictures only and setting the slide speed to 0 or 1 so it makes an animation)


    • Visual Diorama (Insert a background picture, then add clip art on top to tell the story, another idea is to duplicate a slide then move the dinosaurs one step, then duplicate that slide and move the dinosaurs again etc. Add speech bubbles and narrative boxes)


    • Voice over slides (Photos and diagrams with voice over giving the information)


    • POV of Character (Photos, diagrams, clipart. slides with no text but a voice over that talks from the 'Point of View' of the main character)


    • Create a Quiz (make a quiz that hyperlinks slides with right and wrong slides and information that answers the questions)


    • Sing a song (record your voice singing a song that has your presentation information in it, it could be to the tune of a familiar song or create your own. Insert the song so it will play over several slides

    For those teachers and students who have the equipment and the access there are many other ways to present and publish work