I have heard the comment 'Twitter? I just don't get it!' so many times, so I have created a guide for teachers. I hope it helps!

Thursday, 29 April 2010

Thursday, 22 April 2010
Fotobabble
I was reading a post about the iPad written by @dakinane when I saw him mention a flash based application using photos 'Fotobabble.
With this application you can upload a photo, add your voice to it and then embed into your wikis or blogs.
Fotobabble could be used in many ways in the classroom
With this application you can upload a photo, add your voice to it and then embed into your wikis or blogs.
Fotobabble could be used in many ways in the classroom
- as an oral assessment for speeches
- oral assessment for speaking in other languages
- a way of publishing a piece of writing, (selecting a photo that represents the writing)
- publishing explanations, narratives, persuasive and procedural
- final assessment tool in presenting information
- a linear slideshow presentation with several photos and voiceovers
The Amazing Web2.0 Projects Book
This book has been compiled by Terry Freedman (@terryfreedman) website http://www.ictineducation.org/
Teachers and educationalists from all over the world have contributed examples of Web2.0 projects to this book and what a great resource it is. Teachers will find many practical ideas of how to use Web 2.0 technologies in their teaching and learning.
Teachers and educationalists from all over the world have contributed examples of Web2.0 projects to this book and what a great resource it is. Teachers will find many practical ideas of how to use Web 2.0 technologies in their teaching and learning.
PowerPoint as a modelling and teaching tool
I was helping a teacher with ideas of how to integrate ICT into her classroom programme. I asked her what her shared book was and suggested how she could teach 'Shared Book' using the class computer and a group of children. (Read the Shared book with the children first)
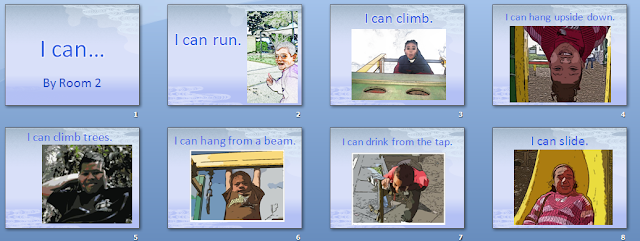 All this was part of their shared book learning experience, and put their learning into an integrated, authentic context. They now have this story on the computer as an extra reading activity.
As a follow up to this, students can take photos of other things they 'can' do and add them to this shared book or create an new one.
- Start off with a blank page, introduce the shared book, ask what the title is, type the Title in
- in the sub title box type by Room #
- Insert a new slide
- Read the text from the Shared book and then start typing it in
- ask questions like "What do I need to type first?" "What goes at the end of the sentence?"
- Computer skills are taught as they are needed i.e. "How do I make a capital letter?" "Who can show me how to type a full stop, what finger should I use?
- As the book was one about 'I can run, I can draw' etc. The teacher taught the children how to take photos, so these 5 and 6 year olds took their own photos and the teacher inserted them into their PowerPoint.
- To finish it off she chose a design template and this was all done as part of the lesson with the children participating alongside.
 All this was part of their shared book learning experience, and put their learning into an integrated, authentic context. They now have this story on the computer as an extra reading activity.
As a follow up to this, students can take photos of other things they 'can' do and add them to this shared book or create an new one.
Sunday, 18 April 2010
Word Clouds for Juniors
And yet another Word Cloud ABCya, (as tweeted by @mdanonbaird) which is perfect for Juniors.
 Go to ABCyaPaste in text

 Click on the Arrow
Click on Randomize to make changes to the Word Cloud

 Click on Fonts to change the font,
Colours to change the layout colours
 and Layout to change the direction of the text!
 Click on Save to save to your computer or print out your Word Cloud.
Simple As!

 Go to ABCya
 Click on the Arrow
 Click on Randomize to make changes to the Word Cloud


Colours to change the layout colours


Simple As!

Monday, 12 April 2010
Tagxedo 'Word Cloud'


You have wide range of colours to choose from, interesting fonts (this example is called John Lennon).
Best of all, there is a variety of shapes or you can create your own word shape.

The word shape could be
- main theme or idea in book
- main theme of a poem
- the title of an essay/story
- main idea of story
- the focus of a science, history, social studies study
This link http://delicious.com/sharpjacqui/wordle are some of the sites I have found on Wordle or other Word clouds. This site (46 Interesting Ways to use Wordle in the classroom) by Tom Barrett is a collaborative Google Doc that anybody can add to with their ideas of how they are using Wordle.
Like Wordle you can save a jpeg or a png for printing out or inserting into blogs or wikis. But I'm looking forward to when you can embed an Interactive version called Tagxedo player like the example here on the Tagxedo site (Scroll down to the last example to see the Word Cloud dance).
Here is a great slideshow 101 ways to use Tagxedo by Hardy Leung
Saturday, 13 March 2010
Lab lessons with Juniors
I was working with a computer lab teacher today looking at ways to work with students. She had a class of Year one students came in!
You need to put some sanity saving measures in when working with a class of 5 and 6 year olds in a lab. They can't sit for long, because they are too excited, so it is best to get them on the computers straight away. If possible don't have them sharing as their collaborative skills at this age aren't that great!
Beforehand you will have needed to teach a couple (or more) of more able students to help the others to log on, and then click on the programme they are going to be using i.e KidPix or Paint. Let them go for it, experimenting with the tools or doing their favourite thing. Once everybody is logged on and in the programme, THEN you can start to add some order to your lessons.
The following are the stages you could go through with Juniors
These happen over several sessions!


Mouse Practice
You need to put some sanity saving measures in when working with a class of 5 and 6 year olds in a lab. They can't sit for long, because they are too excited, so it is best to get them on the computers straight away. If possible don't have them sharing as their collaborative skills at this age aren't that great!
Beforehand you will have needed to teach a couple (or more) of more able students to help the others to log on, and then click on the programme they are going to be using i.e KidPix or Paint. Let them go for it, experimenting with the tools or doing their favourite thing. Once everybody is logged on and in the programme, THEN you can start to add some order to your lessons.
The following are the stages you could go through with Juniors
These happen over several sessions!

- free play
- while they are in free play, work with individuals showing them a new tool i.e dragging background pictures and adding stamps
- show them the typing tool and type their name (you will need a display on a wall that shows the Upper and Lower case letters for those who haven't mastered them yet)
- type the words they know how to write (have high frequency words on the wall for students to look at)
- first official lesson can be drawing a picture about their topic or what they are writing about in their classroom LIMIT THE TOOLS! Pencil and Paint Can ONLY
- Repeat this session many times but bring something new in when the students look ready for it like typing your name (I also teach new things to students who look like they are capable of it as I walk around)
- next session might be typing a sentence
- at some stage teach the more able students how to save (they will help you to save students work)


- once the students are used to all these steps then you might introduce a new programme/Application
- at the same time talk to the students about the magic line, put two hands on the keyboard, this hand can't cross over this side of the magic line and the other hand can't cross over that side of the magic line (I put little pieces of folded paper between the keys to create a magic line)
- draw a picture for their story
- Type a heading for their story that could be printed out
- find a picture in Kidpix that could be printed out
- always remind them of the magic line
- thumbs only on the space bar
- pinkies only on the delete key
- rest fingers on the home keys (those students whose fingers can reach and are ready for it)
Mouse Practice
Mouse Practice PowerPoint Show version
View more presentations from Jacqui Sharp.
To make these Learning Centres follow these instructions
Finally, limit the time students are on the computers, 30 minutes is plenty of time for younger children to be staring at screen. If you have extra time over, then bring out the cameras and take photos that could be used for motivational writing or for publishing their work.
Just remember at this age more than any other age, the students will develop their skills at differing speeds...some a LOT faster than others. Identify those children that have those skills and use them to help you to teach the others. You will find that children learn best from each other!
To make these Learning Centres follow these instructions
Finally, limit the time students are on the computers, 30 minutes is plenty of time for younger children to be staring at screen. If you have extra time over, then bring out the cameras and take photos that could be used for motivational writing or for publishing their work.
Just remember at this age more than any other age, the students will develop their skills at differing speeds...some a LOT faster than others. Identify those children that have those skills and use them to help you to teach the others. You will find that children learn best from each other!
Wednesday, 10 March 2010
Researching smarter
There are still a lot of teachers that are sending children off to do 'research' on Google using one key word.i.e bird (253 million hits later). When they finally find a page that has the information they want, it is invariably printed out, and trawled through looking for information.
 1. have at least 3 key words if you are looking for information on birds, what sort of birds are you looking for, what country etc so now the Google search becomes 'bird native wading' and because we want to search for New Zealand Birds we click on pages from New Zealand.
Now we have 10,400 hits!
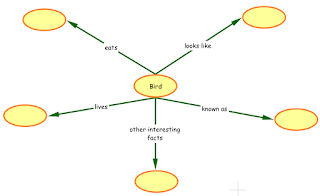 2. Open up a mindmap/Graphic Organiser (I like to use Kidspiration or Inspiration, or you can use online versions) Create a simple mindmap
3. Go back to the internet site you have chosen, press Ctrl F (Command F for Macs) type in one of the key words from questions in mindmap like 'eats'


4. The word eat did not appear on my page so I used a synonym such as feed, click the next button to see each instance of the word feed until you see a sentence that will answer your question
5. Go back to your mindmap and type in the information you found
6. Go between the Internet site and the mindmap adding information
7. Add a picture to your mindmap by right clicking on a picture in your internet page, select Copy Image, go back to mindmap and paste (Ctrl V)
8. Don't forget to reference where information and picture came from

Model this way of researching to your class.
Use this model in all curriculum areas.
Become a smarter researcher yourself and your students will follow!
This is long, tedious, boring and usually irrelevant!
Become a smart researcher with some of these strategies
Now we have 10,400 hits!

3. Go back to the internet site you have chosen, press Ctrl F (Command F for Macs) type in one of the key words from questions in mindmap like 'eats'


4. The word eat did not appear on my page so I used a synonym such as feed, click the next button to see each instance of the word feed until you see a sentence that will answer your question
5. Go back to your mindmap and type in the information you found
6. Go between the Internet site and the mindmap adding information
7. Add a picture to your mindmap by right clicking on a picture in your internet page, select Copy Image, go back to mindmap and paste (Ctrl V)
8. Don't forget to reference where information and picture came from

Model this way of researching to your class.
Use this model in all curriculum areas.
Become a smarter researcher yourself and your students will follow!
Friday, 5 March 2010
What to do with a few minutes spare?
There are few games that I like to play with students when we have a few minutes spare, you need at least a projector (and laptop) and even better a mimio or IWB.
Free Rice
Free Rice is my first favourite. For every question you get right 10 grains of rice gets donated through the World Food Programme.

The reason it is my favourite is that if you click on Change Subjects you can choose from other subjects.

I particularly like to do the Geography questions as most children in New Zealand schools have very little idea of where other countries are in the World.
Lemons for Literacy
 Then there is Lemons for Literacy. With this site every correct answer helps somebody to read in America. Money is donated by the site creators to purchase literacy materials.
With this site you can click on the speaker symbol to hear the words and meanings.
You can also change the type of game by clicking on the 'Defintion Matching' dropdown menu to choose Word meaning. You can also choose a subject rather than General (some of the choices are Business, Medical, School, travel or hospitality). You can also adjust the level of the words.
Free Poverty
Lastly there is Free Poverty
 The goal of this game is to test your knowledge of places on the map. Every correct answer means that freepoverty.com will donate 10 cups of water. The further away from the correct spot and the cups of water decrease, if you are too far away there is 0 cups of water awarded. Unfortunately it does have advertisements on it so check what they are advertising that day before using with your class.

The reason I like using the mimio or IWB is that students can use the pens to interact with words and the maps rather than one person using the computer.
And here is one more I have just found
 Free flour used to donate one spoonful of flour to World Hunger, but they are looking for sponsers. You can still play the game for free.
In this game you get questioned General Knowledge questions. Check out what the advertisements are advertising before using with children.
Free Rice
Free Rice is my first favourite. For every question you get right 10 grains of rice gets donated through the World Food Programme.

The reason it is my favourite is that if you click on Change Subjects you can choose from other subjects.

I particularly like to do the Geography questions as most children in New Zealand schools have very little idea of where other countries are in the World.
Lemons for Literacy

With this site you can click on the speaker symbol to hear the words and meanings.
You can also change the type of game by clicking on the 'Defintion Matching' dropdown menu to choose Word meaning. You can also choose a subject rather than General (some of the choices are Business, Medical, School, travel or hospitality). You can also adjust the level of the words.
Free Poverty
Lastly there is Free Poverty


The reason I like using the mimio or IWB is that students can use the pens to interact with words and the maps rather than one person using the computer.
And here is one more I have just found
Free Flour
 Free flour used to donate one spoonful of flour to World Hunger, but they are looking for sponsers. You can still play the game for free.
In this game you get questioned General Knowledge questions. Check out what the advertisements are advertising before using with children.
Thursday, 4 March 2010
This day in History
 One of the activities I timetable children to do each day before school is to find out what happened on this day in History. Some of the sites I had been using were American (and were the day before, because of time difference).
Sometimes the information on those sites were not really appropriate for children in New Zealand. I came across this site New Zealand History online. What a great way to teach our students New Zealand history.
How to use in the Classroom
IWB or mimio
Make a file using the notebook software of the IWB you are using. Add the links to the first page.
I also link to a weather site and current news site.

This becomes part of our oral language time in the morning where all 3 students have a chance to report back to the class what they have found out. They particularly like using the IWB/mimio to navigate to their pages and we always take the opportunity to use the highlighter pens to identify key words, nouns, great adjectives etc( what ever happens to be our focus at that time.)
Wednesday, 3 March 2010
Simple but an effective way of Publishing
A teacher said to me today that her children were always publishing in the same way, in Word with a frame and a title. She wanted to know some different ways to publish. I showed her my slideshare presentation '59 ways to publish'
Journal Publish
We decided to keep it simple and look at only using Word and PowerPoint. We looked at the Journal story idea. When you look at school journals, most of the pages have pictures in the background and text overlaying the page.
 This is an example of two Word pages side by side. The photos cover the whole page, some of the photos have been lightened with the Washout button and then text has been inserted using textboxes. (Remove the background colour and line from the textbox by clicking on the Fill can and selecting 'No Fill' and the outline shape or line button and select no outline or line).
 One single PowerPoint page can be used for publishing as well. Open PowerPoint, choose a design theme.
 Select a slide layout, type in text, add graphics. Print out single page.
 You can adjust the colours of the template by
 Mac: Open the Toolbox and choose a colour theme from Document Theme
 Windows: PowerPoint 2007 choose from Colours
Journal Publish
We decided to keep it simple and look at only using Word and PowerPoint. We looked at the Journal story idea. When you look at school journals, most of the pages have pictures in the background and text overlaying the page.

Publishing using PowerPoint Templates


Subscribe to:
Posts (Atom)