Thursday, 10 June 2010

'Time Wasting' Kids who take ages to finish work

There is a very simple and effective solution to the problem of students who drag out the publishing or presenting of work on the computer...


  1. You have 'X' amount of time to do this work
  2. If you do not finish it, you print it out and finish by hand

Do not fall for the 'I haven't finished.... I need to be on the computer again tomorrow!'

Children very quickly decide that they don't like presenting 'half and half' work and will miraculously speed up and finish their work.

Monday, 31 May 2010

Kids as Commentators

More and more students are being invited and given access to online discussions, forums and comments on blogs. This is wonderful, the classroom walls are open and children have the freedom to make observations and remarks on other student's posts.

Consequently, it is important for teachers to train children in the 'art' of commenting. There are several rules of netiquette they need to follow. They have to understand that this is an extension of the classroom walls and that rules that they follow in the classroom cross over to their behaviour in online environments.
Here is guide to start students off as online commentators. Use this as a springboard for talking about the type of comments we make, what are good questions and answers for forums and discussions, and most of all how this is a fun, engaging, collaborative extension of our learning.

Thursday, 20 May 2010

Lino It

Lino It is a an online stickies wall. It is similar to Wallwisher where you can post stickers, add photos and movies. You can also upload links to documents. It is collaborative and can be embedded into blogs and wikis. This could be a great presenting tool for students.

Once you have joined up click on Create a New Canvas
Choose a Background, Name your Canvas.


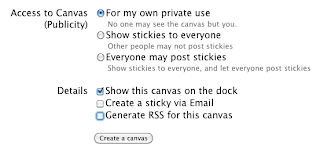
Choose who has access and the Details  you want to show. Click on Create a Canvas


Add Stickies by dragging a sticky onto the canvas and typing into it.
Add a photo by clicking on the Photo icon, insert a photo from your computer, add text by clicking on the Frame option.
Add a movie by making a choice from Youtube, Ustream or Vimeo, paste in the URL of the video.

Attach files to the canvas by clicking on the Attachment button. Choose a file by browsing and an upload link to the file will appear.
Add a Transparent sticky by clicking on the Transparent button, type your text in.

Extra Features
Click on the Information button on the Palette to show the embed code.
Dates can be added to text stickies.
Pin a sticky to a canvas by moving the mouse over the top right hand of the sticky, a pin will appear, click on it to pin it. To unpin it, click on the pin again.
Move the stickies behind or in front by holding down the (Option Key-Mac) (Alt key-Win) and clicking.
Add tags to stickies which enables highlighting of all stickies with that tag.
There is a peel off option, click on the tick icon at the bottom of the right hand side of sticky. Once it has been peeled it is gone forever.
Sizes and colour of text can be changed when editing.
Stickies can be resized by clicking and dragging on the bottom right hand corner.
New stickies can be highlighted by clicking on 'Highlight New'.

How to use Lino It

In the example below I have used Lino It as a Presentation instructional tool.


Other ways of using it
  • collaborative question answer (you would do this in groups on computers
  • as an alternative to PowerPoint presentations
  • as an instructional tool
  • introduction to new topic

Scribble Maps and Google

One of the schools I visit are doing a Pacific Migration Unit and I showed some of the teachers how they could use Scribble Maps as an activity.

Each child can create their own Scribble Map illustrating where they or their family came from.
Type in the address, press Enter.


Markers

Click on the marker button

Select a marker from the choices, look at the drop down menu for more markers.


Mark the spot on the map.  


 Annotate your Markers

Add pictures and/or movies to the markers by clicking on the Advanced Editing choice. Images can only be entered by using a 'URL' Check to make sure the image you add is smaller than 300kbs. If it shows up to large in the map, you can change the width and height within the code 'width="500" height="370"' change the numbers to about width = 125 height =95


 Draw a line using the line tool on the tool bar from one spot to the other.
Add text boxes by clicking on the ABC button. Click on the arrow button to move textboxes into place

Embedding
Click on the Menu button to Save and to embed into a blog or a wiki. Choose Widget/Embed.

The one problem I did come up with is in the embedding in blogs. I had to add a small bit of code to the html, so instead of this at the end
 The Scribble map embeds fine in Wikispaces.
This example shows some of the Volcanoes in Auckland.

Other Ways to use Scribble Maps
  • plot places from a novel, journal story
  • famous landmarks in your own country, the country you are studying or world
  • plot a famous journey (Livingston, Shackleton, Hillary, Captain Cook)
  • retell the adventures of an explorer, famous person
  • retell your own family's migration story
  • make up your own incredible journey plot the places visited and write/illustrate what you found there
  • save the maps as pictures for inserting into Documents where students enlarge on what they have been writing about
  • use with an Interactive Whiteboard (or projector on a screen) to create collaborative mapping
  • improve students Geography by concentrating on a country at a time and find something indigenous to that country and adding it each day as a 'When we have a few minutes spare' activity

Keep up to date with new features from Scribble Map by reading their blog.
There are so many features that I haven't discovered yet, but I am sure your students will. This is an amazing resource which is always under development and being improved.

Thursday, 13 May 2010

Volcanoes, computers, animations - Authentic Context

One of my schools are studying Volcanoes at the moment, and as we live in the city of Volcanoes (Auckland), this was a great opportunity to link our learning to an authentic context.

ICT component: View this slideshow, click on the links and follow the instructions on the slide.
Work through the PowerPoint file 'Making a Volcano'
  • watch the animation on how a volcano erupts
  • Look at the Shake, Rattle and Roll site, take notes on what the animations look like
  • Look at the animations on Weather Whizz kids and take notes
  • Look at the different types of Volcanoes on Volcano Explorer, build your own virtual Volcano and see how it erupts
Follow the animation steps in the Animating objects PowerPoint and practice making an animation.

Once all of the students have made the animation, share them with the class and talk about if the animations are in the right order. Revisit Volcano Explorer and look at all of the different volcanoes and identify the different ways the volcanoes erupt.
Ask the students can they identify what type of volcano they have, and if the order of eruption correct. If not then they can work on their volcanoes to  make the necessary adjustments.

Further Activities:
  • Select one of the Volcanoes in Auckland, take a photo or find a photo, crop it, identify what type of volcano it is and create a volcanic eruption simulation
  • create a volcanic simulation of your local volcano, upload to Slideboom, embed in a Glogster poster explaining the type of volcano it is 
  • Read 'Under the Mountain' by Maurice Gee (a fantasy fiction based some of the volcanoes in Auckland) Create a map showing the positions and type of volcano,  create a simulation for the 3 different volcanoes

Thursday, 29 April 2010

Twitter? I just don't get it! A guide for teachers

I have heard the comment 'Twitter? I just don't get it!' so many times, so I have created a guide for teachers. I hope it helps!

Thursday, 22 April 2010

Fotobabble

I was reading a post about the iPad written by @dakinane when I saw him mention a flash based application using photos 'Fotobabble.
With this application you can upload a photo, add your voice to it and then embed into your wikis or blogs.
Fotobabble could be used in  many ways in the classroom

  • as an oral assessment for speeches
  • oral assessment for speaking in other languages
  • a way of publishing a piece of writing, (selecting a photo that represents the writing)
  • publishing explanations, narratives, persuasive and procedural
  • final assessment tool in presenting information
  • a linear slideshow presentation with several photos and voiceovers
This is a great tool for the verbal/linguist student. It is very quick and easy to use

The Amazing Web2.0 Projects Book

This book has been compiled by Terry Freedman (@terryfreedman) website http://www.ictineducation.org/
Teachers and educationalists from all over the world have contributed examples of Web2.0 projects to this book and what a great resource it is. Teachers will find many practical ideas of how to use Web 2.0 technologies in their teaching and learning.

PowerPoint as a modelling and teaching tool

I was helping a teacher with ideas of how to integrate ICT into her classroom programme. I asked her what her shared book was and suggested how she could teach 'Shared Book' using the class computer and a group of children. (Read the Shared book with the children first)

  • Start off with a blank page, introduce the shared book, ask what the title is, type the Title in
  • in the sub title box type by Room #
  • Insert a new slide
  • Read the text from the Shared book and then start typing it in
  • ask questions like "What do I need to type first?" "What goes at the end of the sentence?"
  • Computer skills are taught as they are needed i.e. "How do I make a capital letter?" "Who can show me how to type a full stop, what finger should I use?
  • As the book was one about 'I can run, I can draw' etc. The teacher taught the children how to take photos, so these 5 and 6 year olds took their own photos and the teacher inserted them into their PowerPoint. 
  • To finish it off she chose a design template and this was all done as part of the lesson with the children participating alongside.
 All this was part of their shared book learning experience, and put their learning into an integrated, authentic context. They now have this story on the computer as an extra reading activity.

As a follow up to this, students can take photos of other things they 'can' do and add them to this shared book or create an new one.

Sunday, 18 April 2010

Word Clouds for Juniors

And yet another Word Cloud ABCya, (as tweeted by @mdanonbaird) which is perfect for Juniors.

Go to ABCya
Paste in text


Click on the Arrow 


Click on Randomize to make changes to the Word Cloud
Click on Fonts to change the font,


Colours to change the layout colours


and Layout to change the direction of the text!


Click on Save to save to your computer or print out your Word Cloud.

Simple As!

Monday, 12 April 2010

Tagxedo 'Word Cloud'

Thanks to Technololgy Bits, Bytes and Nibbles blog post and the writer @cyndidannerkuhn who posted it on twitter, I came across a new player in the 'Word Cloud' arena Tagxedo

There are a lot of choices with this Tag Cloud generator.


You have wide range of colours to choose from, interesting fonts (this example is called John Lennon).


Best of all, there is a variety of shapes or you can create your own word shape.
 There are huge opportunities for this feature to be used in education.
The word shape could be
  • main theme or idea in book
  • main theme of a poem
  • the title of an essay/story
  • main idea of story
  • the focus of a science, history, social studies study
This was a blog post I wrote about Wordle in June 2008, all activities can be completed in Tagxedo
This link http://delicious.com/sharpjacqui/wordle are some of the sites I have found on Wordle or other Word clouds. This site (46 Interesting Ways to use Wordle in the classroom) by Tom Barrett is a collaborative Google Doc that anybody can add to with their ideas of how they are using Wordle.
Like Wordle you can save a jpeg or a png for printing out or inserting into blogs or wikis. But I'm looking forward to when you can embed an Interactive version called Tagxedo player like the example here on the Tagxedo site (Scroll down to the last example to see the Word Cloud dance).

Here is a great slideshow 101 ways to use Tagxedo by Hardy Leung