Friday, 13 August 2010

Space Technology Unit

The latest technology unit I have written is on Space. The focus of the unit is to understand that several models need to be made and tested before a prototype can be created.
Click on the Full button to see this document in full screen.
The Juniors are going to be making Origami spaceships and the Seniors will be creating spaceships according to their own specifications.


The Seniors will be looking at Richard Bransons 'Spaceship Two'


The seniors also have a PowerPoint with links to the websites and movies that will help them with their tasks.
The assessment for the Seniors is to itemise the steps that it has taken to get to the final design of Spaceship Two.

As an Extra...
These students worked on the Volcano eruptions last term so suggesting that they animate the orbiting of planets around the sun was not a difficult task for them to achieve. They were able to apply the same techniques they used with animating 'Erupting Volcanoes'.

Which of course lead to them wanting to animate spaceships.

Students can create their own 'Spaceships/Rockets' in Paint or Artrage. These are then animated in PowerPoint or Keynote.

We used Artrage to create backgrounds.

Sunday, 8 August 2010

Clever Stitch - Panoramic Photos

Download CleVR Stitcher to your computer. Upload several photos to Clever Stitch and the software will create a panorama mixture of your photos.

You can upload the finished photo to the Clever stitch site, and then copy the embed code to create an interactive Panorama on your wiki or blog.


This is a panorama I made with my photos from Mount Eden

Wednesday, 4 August 2010

Lifting Student Achievement with Technology

This is a presentation created by a teacher to present to the Board of Trustees. This teacher is a self confessed Luddite who two years ago did not like working with computers in her classroom. Now she is totally sold. What is so wonderful about this presentation is the evidence the teacher has to how computers and the use of the 'mimio' have 'significantly' lifted student achievement in her class.

Lifting Student Achievement with Technology

This is a presentation created by a teacher to present to the Board of Trustees. This teacher is a self confessed Luddite who two years ago did not like working with computers in her classroom. Now she is totally sold. What is so wonderful about this presentation is the evidence the teacher has to how computers and the use of the 'mimio' have 'significantly' lifted student achievement in her class.

Younger Students and Computers - you need to teach them how

Teachers of younger children tend to not let their students use the computers for independent activities, mainly because
  • the children have no mouse skills
  • they don't know how to single or double click
  • they don't know how to navigate within the website or the game
With the younger ones and the ones that not so able, use the math activities as a teaching tool, rather than as an independent activity. This way students will learn how to do the activity with you modelling and coaching them. I always talk through what I am doing with them. In the  example to the right, I would show them how to open the file, I would have spare keyboards available and when we are ready to type the answer into the square, I would say
"How many suns are in this circle, lets count them, see how I'm moving the mouse pointer over each sun. So what is the answer? Now we will type the answer into the square below, but first we must click in the box, now we type the answer." Then we would repeat that process but this time I would be asking, what is the next step we have to do, once they have the idea I would then hand the activity over to the children. After a while of demonstrating whilst teaching, students will be able to do the activities independently. This is the ideal time to teach troubleshooting as you will see what children have difficulty with.

In the example below I would teach children how to open up the PowerPoint file, what button to click to turn it into a slideshow and then how to get the PowerPoint pen. If you have an IWB or mimio, then you can save the file as a PDF and then import into the notebook software so that the notebook pens can be used.
Count
View more presentations from Jacqui Sharp.


Don't ever assume that young children know how to use the tools or the buttons, they need to be taught by you demonstrating it.

Monday, 2 August 2010

Import PowerPoint into notebook software

Most notebook software will enable you to import PowerPoint files, (but it is made easier by saving them as PDF files) into your notebook files. Sometimes I prefer to create my activities in PowerPoint because of the templates and designs.

The following is an example of a cloze activity, based on instructional reader. It is created in PowerPoint, I added a template, then saved as a PDF file and then imported into Activstudio (File-Import-From PDF)
where students can use the tools to fill in the words.


and into 'mimo' notebook (File-Import)


and drag the PDF file onto a Smartbook notebook page.

Sunday, 1 August 2010

Make a Poetry file

I remember many years ago as a student teacher having to create a poetry file for an assignment. I cut up cardboard, used fancy felt-tips, wrote a different poem on each cardboard sheet, illustrated them...it took hours and hours.
When I visit junior classrooms, I often see blown up Poem Cards that teachers are using with children. I advise teachers to make IWB notebook files of their poems. Once they have made their poetry files and saved as a single document, they can use them in conjunction with their Poem cards.
They can use all of the tools such as 'highlighter, shapes, pen tool' to teach conventions of text and poetry. The blown up Poem Cards are still used as independent reading activities.

If you do not have an Interactive Board, but you do have a projector than make your poem files in PowerPoint or Keynote (or Google Presentation) files.
Use your whiteboard markers to teach conventions of text and poetry.

Make a Poetry file

I remember many years ago as a student teacher having to create a poetry file for an assignment. I cut up cardboard, used fancy felt-tips, wrote a different poem on each cardboard sheet, illustrated them...it took hours and hours.
When I visit junior classrooms, I often see blown up Poem Cards that teachers are using with children. I advise teachers to make IWB notebook files of their poems. Once they have made their poetry files and saved as a single document, they can use them in conjunction with their Poem cards.
They can use all of the tools such as 'highlighter, shapes, pen tool' to teach conventions of text and poetry. The blown up Poem Cards are still used as independent reading activities.

Thursday, 10 June 2010

'Time Wasting' Kids who take ages to finish work

There is a very simple and effective solution to the problem of students who drag out the publishing or presenting of work on the computer...


  1. You have 'X' amount of time to do this work
  2. If you do not finish it, you print it out and finish by hand

Do not fall for the 'I haven't finished.... I need to be on the computer again tomorrow!'

Children very quickly decide that they don't like presenting 'half and half' work and will miraculously speed up and finish their work.

Monday, 31 May 2010

Kids as Commentators

More and more students are being invited and given access to online discussions, forums and comments on blogs. This is wonderful, the classroom walls are open and children have the freedom to make observations and remarks on other student's posts.

Consequently, it is important for teachers to train children in the 'art' of commenting. There are several rules of netiquette they need to follow. They have to understand that this is an extension of the classroom walls and that rules that they follow in the classroom cross over to their behaviour in online environments.
Here is guide to start students off as online commentators. Use this as a springboard for talking about the type of comments we make, what are good questions and answers for forums and discussions, and most of all how this is a fun, engaging, collaborative extension of our learning.

Thursday, 20 May 2010

Lino It

Lino It is a an online stickies wall. It is similar to Wallwisher where you can post stickers, add photos and movies. You can also upload links to documents. It is collaborative and can be embedded into blogs and wikis. This could be a great presenting tool for students.
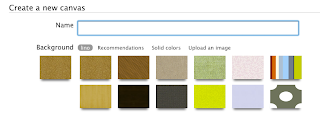
Once you have joined up click on Create a New Canvas
Choose a Background, Name your Canvas.
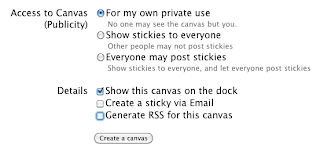


Choose who has access and the Details  you want to show. Click on Create a Canvas


Add Stickies by dragging a sticky onto the canvas and typing into it.
Add a photo by clicking on the Photo icon, insert a photo from your computer, add text by clicking on the Frame option.
Add a movie by making a choice from Youtube, Ustream or Vimeo, paste in the URL of the video.

Attach files to the canvas by clicking on the Attachment button. Choose a file by browsing and an upload link to the file will appear.
Add a Transparent sticky by clicking on the Transparent button, type your text in.

Extra Features
Click on the Information button on the Palette to show the embed code.
Dates can be added to text stickies.
Pin a sticky to a canvas by moving the mouse over the top right hand of the sticky, a pin will appear, click on it to pin it. To unpin it, click on the pin again.
Move the stickies behind or in front by holding down the (Option Key-Mac) (Alt key-Win) and clicking.
Add tags to stickies which enables highlighting of all stickies with that tag.
There is a peel off option, click on the tick icon at the bottom of the right hand side of sticky. Once it has been peeled it is gone forever.
Sizes and colour of text can be changed when editing.
Stickies can be resized by clicking and dragging on the bottom right hand corner.
New stickies can be highlighted by clicking on 'Highlight New'.

How to use Lino It

In the example below I have used Lino It as a Presentation instructional tool.


Other ways of using it
  • collaborative question answer (you would do this in groups on computers
  • as an alternative to PowerPoint presentations
  • as an instructional tool
  • introduction to new topic