Friday, 19 December 2008

mimio Pad


Judy Bentley from Watermans demonstrated the mimio pad to me and I loved it. So what was so cool about this technology?
  1. you don't have to have all of the other mimio gear, it operates as a mimio itself, all you need is a projector, whiteboard and laptop
  2. With a mimio Pad, you can walk about the class or work with students individually while still being in control of what is on the Whiteboard up to 10 metres away. All the mimio tools are on the pad, and you use a pen as a mouse to activate them. As a Facilitator this will be invaluable for me in my courses as I will be able to walk around looking at what teachers are doing on their computers and instead of rushing back to the laptop I can stay there with the mimio Pad and continue to demonstrate what I need to show them
  3. It can be passed around to students to use, and if your projector still is not suspended from the ceiling but sitting on the desk, then you won't have to worry about students standing in front of the projector casting shadows on the Whiteboard
  4. It does not need software, all it uses is a small mimio wireless receiver (looks like a memory stick) that plugs into your computer's USB port. The integrated rechargeable battery provides up to 16 hours of wireless operation and the mimio Pad can also be USB charged.

Hint #1 pens and batteries


Check the batteries in your mimio and IWB pens on a regular basis! I had a leaking battery in mine and discovered it before it did too much damage. If you are not going to be using them for a long time then it could be a good idea to remove the batteries until you do need them.

Wednesday, 17 December 2008

Planning, linking, websites and mimios/IWB

With mimios and IWBs comes a huge amount of activities already created for you. Plus there are all the other activities that are teacher made in Kidspiration, Inspiration, Word, PowerPoint etc. And then I see that teachers have found all these wonderful websites but are not fully utilising them to their full potential. How can we manage all these websites and activities we may have stored on our computers?
Answer: Incorporate it into your planning. Hyperlink the activities, websites, or teaching resources into your planning and launch the sites from there. This is a perfect way of managing all of these links and it is all in one place plus you are able to see what resources you are mainly using. In this example I have colour coded the activities, red for Flip charts, orange for PowerPoint, green for Inspiration, blue for websites and black for book work.

Proofreading using mimio or IWB


  • Choose a student's story that has been drafted on the computer and use that as a proof reading model at the beginning or end of a writing session
  • Have the whole class or maybe a targeted group discuss what changes need to be made and let the children take charge of the proofreading
  • use an example of drafted writing as a proofreading activity to be completed while waiting to conference (several children can be working on this activity at one time)
  • have a child drafting using the mimio/ IWB instead of in their books
  • have two children drafting on the mimio/ IWB creating a collaborative story, print out and they can proofread, edit and publish on their own
  • use the mimio/ IWB as one of the activities on your developmental circuit

mimios...some beginning thoughts

There are many mimios out in schools. A lot of teachers are not using them to their full potential, mostly because of technical issues of calibration, software and hardware conflicts, setting up problems and most of all lack of professional development.


In this particular school the mimio is attached to a LCD TV. This works well with small groups or the whole class on the mat in front of the TV. The mimio image was TV quality.

I would use the mimio attached to a TV screen more in the Junior school. It is least distacting for the whole class as it is smaller and could be used unobtrusively with small groups.

Activboards beginning thoughts

Many schools are investing in Interactive Whiteboards. A lot of teachers are not using them to their full potential, mostly because of technical issues of calibration, software and hardware conflicts, setting up problems and most of all lack of professional development. Then there is the issue of 'Which should we buy for our school?'

Here is one example of Activboards being used in one school. The Activboard has the projector attached to the screen. (Big tick here, no projector or wires hanging from ceilings or sitting precariously on tables).
The screen can be moved up and down according to the child's height. The screen is large and can be seen by the whole class right to the back of the room. Teachers have very little problems calibrating because the projector is fixed to the screen. There is a wireless keyboard that children or teacher can use anywhere in the classroom. The only down was maybe the clarity, the room needed to be darker or the projector needed to have higher lumens, but it was a minor point as it made no difference to the children.


The Activboard works well in the Senior School because it can be seen from the back of the room and when you have big children sitting in a classroom with all your furniture, there is not a lot of room for sitting up the front. I also liked how you could direct student's attention to it while they are working at their desks and they could all easily see it.

Monday, 1 December 2008

Google Font

Create a cool title or heading for your Wiki or Blog using Google Font. Type in the words and click Create Logo!


Click on Download Logo


Do a right click over the logo and select Save Picture as


Save it to a folder on your computer and insert as a picture into your wiki or blog.

Tuesday, 25 November 2008

SlideBoom and animated PowerPoint

Set up an account, upload animated PowerPoints with sounds, video, links, buttons and transitions to SlideBoom. Embed in blogs and wikis. Students will need to critique their PowerPoints before uploading, remind them that 'less is more' when adding effects to their slideshows.


Helping children to become better researchers

To teach children how to become competent researchers requires several stages. I like to use Inspiration (or Kidspiration) Graphic Organisers to guide them in this task. Once they have some knowledge of the topic at hand teachers generally set them an activity where they have to come up with a question to research about. Most children find this difficult.

That is why I use this Graphic Organiser 'What do we know about?' Students fill in what they know about the topic. I then ask them to choose one of the ideas that they would like to know more about. They then choose one of the ideas and turn that into a question.
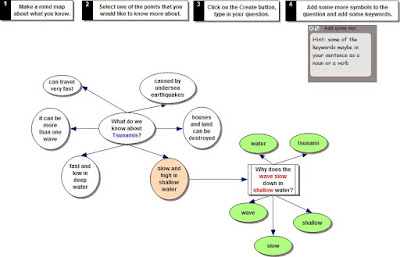


The nouns or verbs in the question are likely to be their search words.


The next step is to go to Google or any other search engine http://delicious.com/sharpjacqui/searchengines enter in the search words. Click on a website. Generally most of the websites they will choose will have a lot of text which can be quite daunting to read. This is when I introduce my trick of Ctrl F (Command - F for Macs). This brings up the 'Find' box,

type in one of the key words, if that word is on the page it will be highlighted, ask the child to read the sentence the word is highlighted in, refer them back to their research question and ask them if it answers their question, if not they click on the Next and that will highlight the next instance of that word, again they read that sentence. "Does it answer the research question?" If so the children highlight just that sentence, copy and paste into a Word document. They continue in this way until they have enough information that answers their research question.
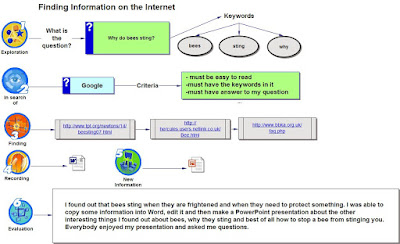
The next Graphic Organiser is the 'Finding Information on the Internet'.
Children type in
  • What the Question is
  • What the keywords are
  • the search engine they are going to use
  • the criteria for the websites they will use
  • the links to the websites
Under the Recording they can hyperlink the picture of the Word icon/symbol to the file they have created with all the copied material from websites. Under New Information is the link to the PowerPoint (or Keynote, or Photo Story, or MovieMaker or iMovie file) that contains the presentation they have made using the information they have found. Finally under Evaluation they type in their final thoughts about their research. This is great model for teachers and students alike. The teacher has a full assessment of the progress and procedures the child went through for their research. They can see what the question was, the key words used, the Internet sites used and then they can compare the 'Word' file with the final presentation to see if the child was able to make sense of the information they found and turn it into their own. Students are showing accountability for their learning by referencing the sites they have visited and demonstrating how they have turned their new knowledge into new information.
For this to work well and for students to become independent researchers this format needs to be repeated often. It can work well for novel studies, topic research, and as a starting point for several writing genres such as procedural, argument and explanation.

Wednesday, 19 November 2008

Make Beliefs Comix


Create comics with characters, panel prompts and talk balloons MakebeliefsComix. Make 2, 3 or 4 page comics. You can't save or download the comics but you can Email or print (or take a screen capture and paste into Word or PowerPoint).
If you are taking a screen capture for showing in a PowerPoint then make sure that you only do a 2 page comic at a time, that way you will get a better image when you make it bigger on the screen.

Children from Hunua School went on class trip to the local Police Station. They presented the experience they had by creating comics in Make Beliefs Comix and then inserted the finished comics into PowerPoint.


Comic Life and Slideshows


You can make slideshows of comic pages in comic life. Before you start turn the page to horizontal. Go to File - Page Format, click on Landscape.

If this Library is not showing then click on the drop down menu and select Built in basic.

Click on the 'One' template and drag and drop on the page.

Drag your Photo in and add your text bubbles, headings and narrative text.
Add more pages with either 'One' template or with a template that has 2 or 3 spaces on it.
Once you have completed all your pages and saved them, then export them as individual jpegs. Go to File - Export - Export to Images.
The individual pages will be exported as separate jpegs.
These can now be imported into Photo Story, MovieMaker, Keynote or PowerPoint. Add music and you have a comic slideshow.