Continuing with using PowerPoint or Keynote in a different way, I was working with a teacher in a school that has intermittent internet access, 2 computers that work sometimes, and she has a projector that she uses in a limited way.
I suggested using the Projector and her laptop as a learning centre activity area. I showed her that she could adapt some of her printed activities for visual interactive learning by creating them in PowerPoint or Keynote as the example below shows.
Students can go to the centre and use Whiteboard markers to write the letters, a buddy can check to see if they are right, another child can move the slides with the arrow key on the keyboard. And the teacher can keep an eye on what the students are doing because it is on the Whiteboard through the projector. You are now making use of technology with students in control!

Showing posts with label PowerPoint. Show all posts
Showing posts with label PowerPoint. Show all posts
Thursday, 23 August 2012
Friday, 17 August 2012
Do all students need to present their work in the same way?
Do students need to all present their work in the same way?
I constantly hear 'Your task is to make a PowerPoint!'
So everybody does the same type of PowerPoint.

And yes there are lots of online options for teachers and students but there are still a lot of teachers who are not ready or not able to make the leap into online publishing. So if we are going to 'Do' PowerPoint (or Keynote) then let's give them choices within that programme.
The slideshow below is an example I made for a school when they said that the students assessment was to make a PowerPoint about what they know about Dinosaurs, this slideshow gives students different ways to publish within PowerPoint or Keynote.
So when you are setting up publishing options, use some of the different ways to publish within PowerPoint or Keynote. Give them these options


For those teachers and students who have the equipment and the access there are many other ways to present and publish work
I constantly hear 'Your task is to make a PowerPoint!'
So everybody does the same type of PowerPoint.
Title................................................Text.........................................Picture

And yes there are lots of online options for teachers and students but there are still a lot of teachers who are not ready or not able to make the leap into online publishing. So if we are going to 'Do' PowerPoint (or Keynote) then let's give them choices within that programme.
The slideshow below is an example I made for a school when they said that the students assessment was to make a PowerPoint about what they know about Dinosaurs, this slideshow gives students different ways to publish within PowerPoint or Keynote.
So when you are setting up publishing options, use some of the different ways to publish within PowerPoint or Keynote. Give them these options
- Pictures tell the story (a series of pictures with the odd slide summing up the pictures so far)
- Pictures with no text, (telling the story with pictures only and setting the slide speed to 0 or 1 so it makes an animation)

- Visual Diorama (Insert a background picture, then add clip art on top to tell the story, another idea is to duplicate a slide then move the dinosaurs one step, then duplicate that slide and move the dinosaurs again etc. Add speech bubbles and narrative boxes)
- Voice over slides (Photos and diagrams with voice over giving the information)

- POV of Character (Photos, diagrams, clipart. slides with no text but a voice over that talks from the 'Point of View' of the main character)

- Create a Quiz (make a quiz that hyperlinks slides with right and wrong slides and information that answers the questions)

- Sing a song (record your voice singing a song that has your presentation information in it, it could be to the tune of a familiar song or create your own. Insert the song so it will play over several slides
For those teachers and students who have the equipment and the access there are many other ways to present and publish work
- http://publishingideas.wikispaces.com/home
- http://101digitalcameraideas.wikispaces.com/Online+Slideshows
- http://sharpjacqui.blogspot.co.nz/2012/03/student-digital-toolkit.html
Wednesday, 21 September 2011
Infographics and Inquiry Presenting
All of my schools at the present are embroiled in Rugby World Cup fever. Students are researching and finding out information not only about their own country but also adopted countries. Soon they will need to present this information so I have been talking to teachers about how 'Infographics' are a great way to present student work.
Students will have created their research question, found their keywords and used the smart researcher tools to find information.
They will have copied photos or graphics to folders and the internet references to WordProcessor (Word, Pages, Google Docs) along with 'brief' notes copied from Internet pages that answer their research question. They will synthesise their notes and present facts and 'hopefully' they will present new ideas with conclusions and inferences.


I am gradually adding examples to Scoop.it that are suitable to show younger students.
Click on this link to see examples suitable to show students.
I will be following up with more posts on this subject as I develop ways of how to teach students how to find the right sort of information, graphics, symbols etc to suit their presentations.
Students will have created their research question, found their keywords and used the smart researcher tools to find information.
They will have copied photos or graphics to folders and the internet references to WordProcessor (Word, Pages, Google Docs) along with 'brief' notes copied from Internet pages that answer their research question. They will synthesise their notes and present facts and 'hopefully' they will present new ideas with conclusions and inferences.
Now how could they present it?
The following example has been created in Comiclife.

Or in PowerPoint

Or in Keynote

The following diagram lists all of the possible elements that could be included in an infographic

Or in Keynote

The following diagram lists all of the possible elements that could be included in an infographic

The criteria for an infographic presentation is
- Keep a balance between graphics, text, charts and numbers
- Be aware of what colours work well together, not too many and remember complimentary colours (opposites of the colour wheel)
- Check all of the time that you are answering your research question
- Reference your facts, graphics etc
- Include graphics, photos, graphs, flow charts, graphic organisers, statistics
- Add your own inferences from the information presented
For younger children you can simplify the criteria

Some of the programmes that would be suitable for creating infographics
- PowerPoint: more suitable then Word as all of the different objects will not move around randomly + version 2007 and 2010 have great Smart Art graphics
- Pages or Keynote (for Mac): easy to move objects around and place them
- ComicLife: great Title graphics, easy to create 'Chart' type infographics
- Kidspiration and Inspiration: Mindmapping type infographics
I am gradually adding examples to Scoop.it that are suitable to show younger students.
Click on this link to see examples suitable to show students.
Thursday, 19 May 2011
Publishing Junior stories
One of my junior teachers has had a frustrating time trying to publish her Year one students' stories. She uses Word and has a frame for her Picture box and a text box below that for the story. After she has saved 24 pages of this format and typed in her students' stories, text boxes and frames have moved and she has the tiresome task of moving all the boxes in place again. She asked if there was a way of anchoring the text boxes, but unfortunately there is not. So I came up with the idea of making a PowerPoint Template.


 Once you have the template looking the way you want it, then duplicate the slide by clicking on it once in the slide tray, Press Ctrl D or Command D however many times you need copies.
 Go File - Save as and Choose Template from the dropdown menu. Make sure that you know where it is saving to as when you choose 'Template' it defaults back to Template folder.
Now when this teacher publishes her students' work, she can open up this template, type in the stories, no text boxes will move around and she can print it out for the students to illustrate. Once she saves it, she still has the blank template to use over again.


- Open up PowerPoint, choose plain template
- Go to File - Page Setup and change Page Orientation to Portrait
- Next choose a Layout, choose one with a Text box space, she deleted the title
- Next resize the text box and add a square shape for the picture box, move them to where you want them, set your font and size
- Remove the bullet points from text by clicking on the bullet point button on toolbar
- Last step is fix the rulers, because when you remove the bullet point the second line of text indents and you need to fix that


Now when this teacher publishes her students' work, she can open up this template, type in the stories, no text boxes will move around and she can print it out for the students to illustrate. Once she saves it, she still has the blank template to use over again.
Thursday, 13 May 2010
Volcanoes, computers, animations - Authentic Context
One of my schools are studying Volcanoes at the moment, and as we live in the city of Volcanoes (Auckland), this was a great opportunity to link our learning to an authentic context.
ICT component: View this slideshow, click on the links and follow the instructions on the slide.
Work through the PowerPoint file 'Making a Volcano'
 Once all of the students have made the animation, share them with the class and talk about if the animations are in the right order. Revisit Volcano Explorer and look at all of the different volcanoes and identify the different ways the volcanoes erupt.
Ask the students can they identify what type of volcano they have, and if the order of eruption correct. If not then they can work on their volcanoes to make the necessary adjustments.
Further Activities:
ICT component: View this slideshow, click on the links and follow the instructions on the slide.
Work through the PowerPoint file 'Making a Volcano'
- watch the animation on how a volcano erupts
- Look at the Shake, Rattle and Roll site, take notes on what the animations look like
- Look at the animations on Weather Whizz kids and take notes
- Look at the different types of Volcanoes on Volcano Explorer, build your own virtual Volcano and see how it erupts
Volcanic Simulations
View more presentations from Jacqui Sharp.
Follow the animation steps in the Animating objects PowerPoint and practice making an animation.

Ask the students can they identify what type of volcano they have, and if the order of eruption correct. If not then they can work on their volcanoes to make the necessary adjustments.
Further Activities:
- Select one of the Volcanoes in Auckland, take a photo or find a photo, crop it, identify what type of volcano it is and create a volcanic eruption simulation
- create a volcanic simulation of your local volcano, upload to Slideboom, embed in a Glogster poster explaining the type of volcano it is
- Read 'Under the Mountain' by Maurice Gee (a fantasy fiction based some of the volcanoes in Auckland) Create a map showing the positions and type of volcano, create a simulation for the 3 different volcanoes
Thursday, 22 April 2010
PowerPoint as a modelling and teaching tool
I was helping a teacher with ideas of how to integrate ICT into her classroom programme. I asked her what her shared book was and suggested how she could teach 'Shared Book' using the class computer and a group of children. (Read the Shared book with the children first)
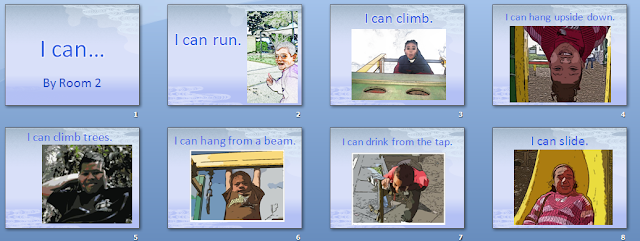 All this was part of their shared book learning experience, and put their learning into an integrated, authentic context. They now have this story on the computer as an extra reading activity.
As a follow up to this, students can take photos of other things they 'can' do and add them to this shared book or create an new one.
- Start off with a blank page, introduce the shared book, ask what the title is, type the Title in
- in the sub title box type by Room #
- Insert a new slide
- Read the text from the Shared book and then start typing it in
- ask questions like "What do I need to type first?" "What goes at the end of the sentence?"
- Computer skills are taught as they are needed i.e. "How do I make a capital letter?" "Who can show me how to type a full stop, what finger should I use?
- As the book was one about 'I can run, I can draw' etc. The teacher taught the children how to take photos, so these 5 and 6 year olds took their own photos and the teacher inserted them into their PowerPoint.
- To finish it off she chose a design template and this was all done as part of the lesson with the children participating alongside.
 All this was part of their shared book learning experience, and put their learning into an integrated, authentic context. They now have this story on the computer as an extra reading activity.
As a follow up to this, students can take photos of other things they 'can' do and add them to this shared book or create an new one.
Saturday, 13 March 2010
Lab lessons with Juniors
I was working with a computer lab teacher today looking at ways to work with students. She had a class of Year one students came in!
You need to put some sanity saving measures in when working with a class of 5 and 6 year olds in a lab. They can't sit for long, because they are too excited, so it is best to get them on the computers straight away. If possible don't have them sharing as their collaborative skills at this age aren't that great!
Beforehand you will have needed to teach a couple (or more) of more able students to help the others to log on, and then click on the programme they are going to be using i.e KidPix or Paint. Let them go for it, experimenting with the tools or doing their favourite thing. Once everybody is logged on and in the programme, THEN you can start to add some order to your lessons.
The following are the stages you could go through with Juniors
These happen over several sessions!


Mouse Practice
You need to put some sanity saving measures in when working with a class of 5 and 6 year olds in a lab. They can't sit for long, because they are too excited, so it is best to get them on the computers straight away. If possible don't have them sharing as their collaborative skills at this age aren't that great!
Beforehand you will have needed to teach a couple (or more) of more able students to help the others to log on, and then click on the programme they are going to be using i.e KidPix or Paint. Let them go for it, experimenting with the tools or doing their favourite thing. Once everybody is logged on and in the programme, THEN you can start to add some order to your lessons.
The following are the stages you could go through with Juniors
These happen over several sessions!

- free play
- while they are in free play, work with individuals showing them a new tool i.e dragging background pictures and adding stamps
- show them the typing tool and type their name (you will need a display on a wall that shows the Upper and Lower case letters for those who haven't mastered them yet)
- type the words they know how to write (have high frequency words on the wall for students to look at)
- first official lesson can be drawing a picture about their topic or what they are writing about in their classroom LIMIT THE TOOLS! Pencil and Paint Can ONLY
- Repeat this session many times but bring something new in when the students look ready for it like typing your name (I also teach new things to students who look like they are capable of it as I walk around)
- next session might be typing a sentence
- at some stage teach the more able students how to save (they will help you to save students work)


- once the students are used to all these steps then you might introduce a new programme/Application
- at the same time talk to the students about the magic line, put two hands on the keyboard, this hand can't cross over this side of the magic line and the other hand can't cross over that side of the magic line (I put little pieces of folded paper between the keys to create a magic line)
- draw a picture for their story
- Type a heading for their story that could be printed out
- find a picture in Kidpix that could be printed out
- always remind them of the magic line
- thumbs only on the space bar
- pinkies only on the delete key
- rest fingers on the home keys (those students whose fingers can reach and are ready for it)
Mouse Practice
Mouse Practice PowerPoint Show version
View more presentations from Jacqui Sharp.
To make these Learning Centres follow these instructions
Finally, limit the time students are on the computers, 30 minutes is plenty of time for younger children to be staring at screen. If you have extra time over, then bring out the cameras and take photos that could be used for motivational writing or for publishing their work.
Just remember at this age more than any other age, the students will develop their skills at differing speeds...some a LOT faster than others. Identify those children that have those skills and use them to help you to teach the others. You will find that children learn best from each other!
Wednesday, 3 March 2010
Simple but an effective way of Publishing
A teacher said to me today that her children were always publishing in the same way, in Word with a frame and a title. She wanted to know some different ways to publish. I showed her my slideshare presentation '59 ways to publish'
Journal Publish
We decided to keep it simple and look at only using Word and PowerPoint. We looked at the Journal story idea. When you look at school journals, most of the pages have pictures in the background and text overlaying the page.
 This is an example of two Word pages side by side. The photos cover the whole page, some of the photos have been lightened with the Washout button and then text has been inserted using textboxes. (Remove the background colour and line from the textbox by clicking on the Fill can and selecting 'No Fill' and the outline shape or line button and select no outline or line).
 One single PowerPoint page can be used for publishing as well. Open PowerPoint, choose a design theme.
 Select a slide layout, type in text, add graphics. Print out single page.
 You can adjust the colours of the template by
 Mac: Open the Toolbox and choose a colour theme from Document Theme
 Windows: PowerPoint 2007 choose from Colours
Journal Publish
We decided to keep it simple and look at only using Word and PowerPoint. We looked at the Journal story idea. When you look at school journals, most of the pages have pictures in the background and text overlaying the page.

Publishing using PowerPoint Templates


Monday, 1 February 2010
This day in History
 One of the activities I timetable children to do each day before school is to find out what happened on this day in History. Some of the sites I had been using were American (and were the day before, because of time difference).
Sometimes the information on those sites were not really appropriate for children in New Zealand. I came across this site New Zealand History online. What a great way to teach our students New Zealand history.
How to use in the Classroom
IWB
Make a file using the notebook software of the IWB you are using. Add the links to the first page.
I also link to a weather site and current news site.

This becomes part of our oral language time in the morning where all 3 students have a chance to report back to the class what they have found out. They particularly like using the IWB to navigate to their pages and we always take the opportunity to use the highlighter pens to identify key words, nouns, great adjectives etc( what ever happens to be our focus at that time.)
Projector only
Make these links in a PowerPoint and hyperlink to the address or the pictures. When presenting back students click on the link and find the item they want to talk about.No Projector or IWB
This still works well without a projector, students take notes of what they have found out and report back to the classroom. This is great activity for making sure that all children get hands on time using the computer and the internet every two weeks.
Friday, 27 November 2009
Twelve Days of Christmas

There are only two weeks left until the end of the school year in New Zealand,
so it is time to start thinking about Christmas activities we could do with the students in our classes. Even though Christmas is during Summer we still adopt a lot of the Northern Hemisphere traditions and teach them in our classes. One noteable case last Christmas was showing the teacher of the bi-lingual Tongan unit how to make paper snowflakes online and offline!
The next few posts are going to concentrate on Christmas activities you can do in the classroom using computers.
Twelve Days of Christmas

- read The Twelve Days of Christmas
- sing the song
- read the Kiwi Version of The Twelve days of Christmas, A Pukeko in a Ponga tree
- sing the song
- finally we would plan and write our own 'Twelve Days of Christmas' story
- The children would write and illustrate their own books
- PowerPoint (Younger children could have a template with most of the words typed and they would fill in the gaps, add pictures and themes to the pages)
- older children could create theirs from scratch
- draw the pictures in Kidpix, Paint or Artrage
- students could draw or paint pictures, take photos of final products
- or use online programmes to create drawings such as Sketchfu ( need to set up an account, click on Download to see image and screen capture or print); Odopod is more suitable for older students, drawings look like watercolours; Sumo is more suitable for older children as it has quite comprehensive tools; Artpad is a simplistic art tool suitable for all ages, take screen captures of finished art work
- other programmes that could be used are PhotoStory 3 (Windows only), Moviemaker (Windows) or iMovie (Mac) Insert photos, record voices or add a music track to create movie.
Inspiration or Kidspiration could be used for the mindmapping of the ideas and publishing as well. Both Kidspiration and Inspiration can be hyperlinked to websites, Inspiration can also have movies embedded on the page.

If you don't have ComicLife then use the Autoshapes in Word


Different themes could be decided on. There are different schools of thought on the original meaning of the song. Here are some ideas for themes that could be used
- characters and settings from a fairy tale or favourite book
- indigenous items from the child's country of origin
- favourite sports (teams)
- international themes such as Global Warming, Third World countries, Disasters
- based on a Social Studies/Science topic studied that year
- presents they would like for Christmas
- presents they would like to give for Christmas
- based on people in the school/classroom
- based on a favourite movie (See the youtube movies below)
- look through a current magazine or newspaper
- write about noteable school or personal events
How about a non-Christmas theme?
There maybe some students in your class who do not celebrate Christmas so they could have a theme about the holidays. I saw a great book in a classroom a few days ago called 'The Twelve Days of Holidays'. This is written from the mother's perspective as she is increasingly getting 'fed up' with her children at home during the holidays. Students could write about- the holiday they are going to have
- their best holiday
- their worst holiday
- their dream holiday
- or from the perspective of a member of their family
Other versions of 'The Twelve Days of Christmas' that can be viewed that could motivate students are the following
- this one is a slideshow with pictures (paintings) of each day
- This next Youtube movie is a good example of how you can create your own Twelve days of Christmas on a particular theme, in this case on Disney stories.
- This version will appeal to Shrek fans. This is a great theme to use picking out characters in the movie.
- And if you want to see the lyrics have a look at this Youtube movie
For more advanced ideas of presenting the twelve days of Christmas which could be embedded into Blogs and wikis...
Wallwisher: Add posts to the wall, could be an individual wall or a collaborative wall
For further instructions on how to use Wallwisher
Glogster a poster yourself application enables you to embed graphics, movies and link to websites.
Create an online book
Mixbook has some great Christmassy templates. Students can publish their Twelve Days of Christmas in Mixbook and then embed into their wiki or blog (for free). They can also be purchased from $6.99 US and sent to you.

There are a lot more online ways of presenting 'The Twelve Days of Christmas', for more ideas look at
Saturday, 17 October 2009
Where the Wild Things are
Where the Wild Things are is an old favourite book of mine and one that I have used with classes many times. The movie is due out on the 3 December 2009 (in NZ) which will renew interest in this old classic. A few years ago I developed some activities using the context of the book and integrated it into the maths we were doing at the time; tessellations and rotation. The skills students learned from working with shapes enabled them create their own Wild Things.
Build a Story: Activity Six
A to Z of Wild Things: An example
Build a Story: Activity Six
A to Z of Wild Things: An example
Wednesday, 9 September 2009
Print out in PowerPoint
A teacher asked me today how could she print out all of the slides on a PowerPoint presentation on one page which then lead me to show her the different ways that are available to print.
Wednesday, 26 August 2009
Number Knowledge, Basic Facts and PowerPoint
 I was working with Jenny today at her school, and she was telling me that the problem she has with Number Knowledge is that children do not know their basic facts and this is throughout the school.
 She wanted to create flash cards quickly, so I suggested making them in PowerPoint.
Choose the Title Only slide from the Slide layout.

Drag the title bar down so it is in the centre of the slide.

Type in the number sentence, insert a square shape from AutoShapes (Shapes).
Resize everything so it fits in the slide


Click on the slide in the Slide Panel, press Ctrl D (Command D for Apple) to duplicate the slide.
Change the numbers and box around, repeat once more until you have 3 slides.
Shift click all 3 slides and then duplicate. Change all the numbers. Repeat this last step until all of the Flash cards have been made.

When printing make sure you select the Handouts - Slides per page 6
Cut out, write the answer on the back, laminate and bag the cards.

The PowerPoints can be used as a computer activity as well. Duplicate each slide and type in the answer, resave as an activity. In Normal view, students click on the box and type in the answer or in Slideshow View they can use the pencil to draw the answer. The next slide will have the answer for them.

Make a series of cards and games and organise them into
- Doubles (to 10) (more than 10)
- Bonds to 10 (creates 10 i.e. 7 +3, 6 +4),
- Combinations up to 5, (a total less than or including 5)
Saturday, 15 August 2009
Inanimate Alice - Multimedia Fiction and Networked Novels
Came across this site Inanimate Alice and I was overwhelmed with ideas of how to use this in a classroom situation. Inanimate Alice is an interactive multimedia story (known as Transmedia, storytelling across multi media platforms) that grows as the main character gets older. The story starts in a simplistic way and gradually increases in readability and game challenge levels. There are 10 levels, four that have been released so far with Episode 5 coming sometime before the end of the year. All these episodes can be viewed for free!
What I liked about it was how it would appeal to visual learners and non-readers alike. Apart from reading, this is also a fantastic motivator for writing and publishing. I recently wrote a post about 'PowerPoints can be great' and this way of presenting a story lends itself (in simplistic terms for young children) as one that could be created in PowerPoint or Keynote because of the hyperlinking abilities. MovieMaker or iMovie could be used as well more so for the animated effects that could be added.
Have a look at this wiki Digital Literacy -Inanimate Alice, (Pascoevale Primary School) there are some fantastic examples of episodes students have written using PowerPoint.
Flight Paths by the same authors is a Networked Novel where readers can participate by adding fragments, ideas or chapters. Again, these stories would be great motivators for writing.

Ways to use this in your classroom
Teachers can request the comprehensive Education Pack which has lesson plans and resource pack. There is also an Education pack available for the iStori.es, an authoring tool.
What is important to note here is that the Multimedia fiction story cannot exist without the writing; that is what makes it powerful. There are striking images coming at you, but the writing is what leads you on, to think, predict, question and wonder what is next.
I believe that this genre of writing and reading is an important development in our literacy programme.
What I liked about it was how it would appeal to visual learners and non-readers alike. Apart from reading, this is also a fantastic motivator for writing and publishing. I recently wrote a post about 'PowerPoints can be great' and this way of presenting a story lends itself (in simplistic terms for young children) as one that could be created in PowerPoint or Keynote because of the hyperlinking abilities. MovieMaker or iMovie could be used as well more so for the animated effects that could be added.
Have a look at this wiki Digital Literacy -Inanimate Alice, (Pascoevale Primary School) there are some fantastic examples of episodes students have written using PowerPoint.
Flight Paths by the same authors is a Networked Novel where readers can participate by adding fragments, ideas or chapters. Again, these stories would be great motivators for writing.
Ways to use this in your classroom
- create their own version of the story making themselves the main character
- take one of the main characters of 'Inanimate Alice' and build a story around that character and their adventures
- continue the story and create different chapters in different countries including details that pertain to the culture of that country
- use special effects of photo editing software (Befunky, Fotoflexer, Lunapic, Picnik, Aviary) for the photos on their story
- retell the story from another perspective
Teachers can request the comprehensive Education Pack which has lesson plans and resource pack. There is also an Education pack available for the iStori.es, an authoring tool.
What is important to note here is that the Multimedia fiction story cannot exist without the writing; that is what makes it powerful. There are striking images coming at you, but the writing is what leads you on, to think, predict, question and wonder what is next.
I believe that this genre of writing and reading is an important development in our literacy programme.
Thursday, 6 August 2009
PowerPoint Presentations can be great
Given the choice of presenting digitally, PowerPoint is the most widely used presentation tool in classrooms. This is because a lot of teachers are not ready to let go of it and experiment with online media or free downloadable software. Consequently it is also a tool that it is used in limited ways
The following slideshow can be used to demonstrate to students the different ways PowerPoint can be used present information.
- most of the time it is used as a Text and Picture slideshow with animations and sound effects
- the presentation is more than likely linear
- and it is a regurgitation of facts
The following slideshow can be used to demonstrate to students the different ways PowerPoint can be used present information.
Friday, 22 May 2009
Creating Comics in Word

I was working with a teacher today who said he was going to make comics in Word.
To make it look more like a comic, upload your photos to Befunky and cartoonise them. Click on Get Started, click on Cartooniser, click on Browse files, select a photo
 , click Open, rotate or crop if necessary, click OK and your photo will appear. Click Save, name your photo and click Save to My desktop, click OK you may be asked to Save again. You may want to crop the white border of the photo
I had previously already showed him how to insert Autoshapes onto a page
 , I usually insert six to a page. Then you click on a shape, go to the Fill can, choose Fill Effects, click on th
 e Picture Tab, click on Choose Picture, select a photo and click Insert.
Once the pictures are inserted then you need to add the speech bubbles and narrative text boxes. This is a wonderful way of publishing children's writing.
You can also do the same thing in PowerPoint but put one photo on each slide and it becomes a Comic Slideshow.
ICT Kids
View more presentations from Jacqui Sharp.
Subscribe to:
Posts (Atom)