
Showing posts with label Keynote. Show all posts
Showing posts with label Keynote. Show all posts
Friday, 25 April 2014
Tuesday, 27 August 2013
Writing and iPads
In Term Two 2013 I demonstrated teaching in an e-Learning class for 2 weeks in a Year 5/6 room at Clevedon School. This post is about how the students used iPads (and other tools) in Writing.
As I plan the work students will be doing, I am always thinking of

On the first day I worked with a couple of groups showing them how to download their Inspiration mindmap 'Narrative Writing Framework' ready for tomorrow and they then went on and taught others in the class.

 I made the framework in Inspiration 9 on my computer and then exported it to Inspiration Maps on the iPad. (If you don't have Inspiration 9 on your computer you can still make your frameworks in Inspiration Maps) I provided a link to the download on the class wiki. I had showed the students how to make a website link on their iPads so that they could access the wiki quickly by loading the website in Safari, tapping on the Share button and tapping on Add to Home Screen. It will appear as an app on your iPad.
We talked about introductions and setting the scene for writing and I demonstrated using the Narrative framework and the Myths and Legends Narrative Walkthrough I had uploaded to Slideshare and embedded on the Wiki Writing Page.
Students used the Inspiration Map as their drafting template and when they had finished they shared and opened in Pages for crafting and editing.
 Day Two
 On the second day I managed to see all of the writing groups at different times to
show them their Proof Reading/Assessment which was created in Google Docs.
Before they are ready to conference with me they have to have looked at the 'Have I...' table and check off that they have attempted or achieved all of the goals.
Because this document was in a table, students had to go to Safari, Chrome or Puffin to edit Google Docs as a Desktop version. They could view the table in the Google Drive App.
On further reflection, I would not use tables in Docs until Google Docs have updated them to be used seamlessly on an iPad.
Day Three
Students are gradually understanding the Writing Charts of Drafting, Conferencing and Publishing. They know not to put themselves on Conferencing if they haven't checked off their 'Have I...' chart. And they are learning very quickly that if I see any missing punctuation they have to leave the Conferencing group immediately and work on it.
Below are some of the choices they can make for Drafting, Conferencing and Publishing.
This was the first time I worked with a conferencing group using the Apple TV and TV set. It was perfect for the job. Students were able to mirror their work to the TV, and the other children were able to peer edit it for them with a little input from me. I had their group learning intentions and success criteria on my iPad in front of me and was able to keep referring students to what they had to concentrate on.
 Day Four
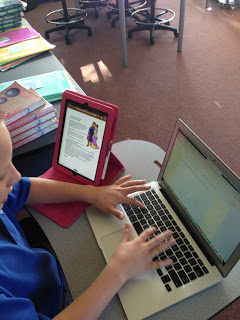
One of the students finished her writing today so she was able to
publish it to our Myths and Legends blog.
 In this photo she has her edited draft open on her iPad and she has transferred it over to the laptop to paste into Blogger and add some pictures.
Later I made the Blogger App available to students so that they could add to the blog from their iPads.
The clipart she has used comes from the fantastic mrdonn.org website which is full of wonderful resources
and free clipart for children. Eventually students will start creating their own clipart. They have learned how to create clipart using Keynote on the iPad and at the end of each day I give them quick 5 minutes lesson on how to draw cartoons. I use 'How to Draw Cartoons' by Brian Platt ($2.99
Kindle on amazon.com)
The apps the students used for practising their cartoon drawings were Paper 53 or
Crayola Paint & Create

This photo shows the students peer editing using the TV and AppleTV. They have mirrored their iPads to screen.
They also discovered to their amazement that they could mirror their mac laptops and iMac as well!
After talking about Vivid Verbs in writing, the children set to their work. A few students have started on their second story and lots are ready to conference and publish. Several have posted to the 'Myths and Legends blog' and some are working on Book Creator. Here is one example of a finished book.
Students are using the Writing task boards well. Some of the students are on their second round of writing stories. When it comes to publishing, they are loving the choices they have.
As I plan the work students will be doing, I am always thinking of
- How could I introduce this to students in a visual way?
- What choices of tools, ideas, activities could I make available for them?
- Am I covering different student learning styles?
When I am in the classroom, I like to ask the students how they like to learn and what are their favourite activities. From that information I add other options to the choices they have.
I personally think that students should have options of how they want to do their work and some of those options are explained further down the post.

On the first day I worked with a couple of groups showing them how to download their Inspiration mindmap 'Narrative Writing Framework' ready for tomorrow and they then went on and taught others in the class.
 I made the framework in Inspiration 9 on my computer and then exported it to Inspiration Maps on the iPad. (If you don't have Inspiration 9 on your computer you can still make your frameworks in Inspiration Maps) I provided a link to the download on the class wiki. I had showed the students how to make a website link on their iPads so that they could access the wiki quickly by loading the website in Safari, tapping on the Share button and tapping on Add to Home Screen. It will appear as an app on your iPad.
We talked about introductions and setting the scene for writing and I demonstrated using the Narrative framework and the Myths and Legends Narrative Walkthrough I had uploaded to Slideshare and embedded on the Wiki Writing Page.
Students used the Inspiration Map as their drafting template and when they had finished they shared and opened in Pages for crafting and editing.
Day TwoOn the second day I managed to see all of the writing groups at different times to show them their Proof Reading/Assessment which was created in Google Docs.
Before they are ready to conference with me they have to have looked at the 'Have I...' table and check off that they have attempted or achieved all of the goals.
Because this document was in a table, students had to go to Safari, Chrome or Puffin to edit Google Docs as a Desktop version. They could view the table in the Google Drive App.
On further reflection, I would not use tables in Docs until Google Docs have updated them to be used seamlessly on an iPad.
Day Three
Students are gradually understanding the Writing Charts of Drafting, Conferencing and Publishing. They know not to put themselves on Conferencing if they haven't checked off their 'Have I...' chart. And they are learning very quickly that if I see any missing punctuation they have to leave the Conferencing group immediately and work on it.
Below are some of the choices they can make for Drafting, Conferencing and Publishing.
This was the first time I worked with a conferencing group using the Apple TV and TV set. It was perfect for the job. Students were able to mirror their work to the TV, and the other children were able to peer edit it for them with a little input from me. I had their group learning intentions and success criteria on my iPad in front of me and was able to keep referring students to what they had to concentrate on.
Day FourOne of the students finished her writing today so she was able to
publish it to our Myths and Legends blog.
In this photo she has her edited draft open on her iPad and she has transferred it over to the laptop to paste into Blogger and add some pictures.Later I made the Blogger App available to students so that they could add to the blog from their iPads.
The clipart she has used comes from the fantastic mrdonn.org website which is full of wonderful resources
and free clipart for children. Eventually students will start creating their own clipart. They have learned how to create clipart using Keynote on the iPad and at the end of each day I give them quick 5 minutes lesson on how to draw cartoons. I use 'How to Draw Cartoons' by Brian Platt ($2.99
Kindle on amazon.com)
The apps the students used for practising their cartoon drawings were Paper 53 or
Crayola Paint & Create


This photo shows the students peer editing using the TV and AppleTV. They have mirrored their iPads to screen.
They also discovered to their amazement that they could mirror their mac laptops and iMac as well!
After talking about Vivid Verbs in writing, the children set to their work. A few students have started on their second story and lots are ready to conference and publish. Several have posted to the 'Myths and Legends blog' and some are working on Book Creator. Here is one example of a finished book.
Students are using the Writing task boards well. Some of the students are on their second round of writing stories. When it comes to publishing, they are loving the choices they have.
Several more children were publishing today. They really like using Book Creator. I reminded them that they could create their own graphics while they were waiting to conference with me which means they can use Sketchup, Minecraft, Pages shapes or any app they have on their iPads.


Students are now starting to get into the habit of checking their Writing Assessment Doc when they are proofreading their writing.

What I have particularly enjoyed in my time at Clevedon, is having the opportunities to look at how children learn, identify what are some of the difficulties they have and thinking about the 'what' and 'how' I can assist them. An example is using the Telescopic Text last Friday which has helped the students to think about expanding their sentences using more adjectives and verbs. Some students are having difficulties sequencing their myths and legends so tomorrow I am going to get them to screen shot or copy the text from an original myth, insert into Notability and let them use the highlighting and pen tools to identify all the different parts of the structure of the story, then they will use the Narrative Framework to plan their writing.
It's not all about iPads!
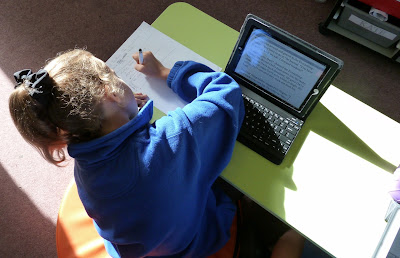 This student is reading her next Myth and 'writing' down the facts/information on a piece of paper!
 Day Seven
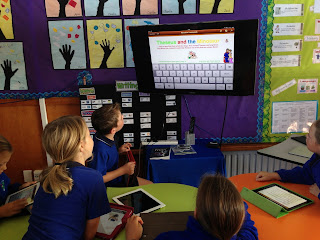
I tried out a couple of new ideas today with the students. I noticed that some of the students were having problems sequencing in order and identifying the main points in a story. I ran a workshop session where they copied the story Dionysus and Ariadne from the website and pasted into Notability.
I then showed the Narrative Framework on the Projector which has been made in Inspiration.
I asked the students to highlight 'Who' were the main characters in Green.

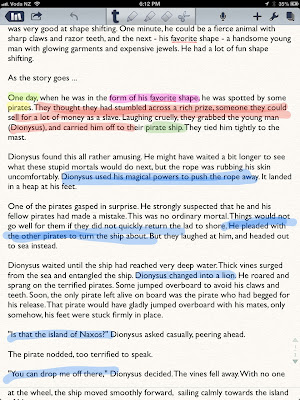 They then had to highlight the 'Where', 'When' and 'What' in different colours. After that we identified what the main problem/conflict was by highlighting in red. We then went on to highlight in blue the main points in the story and finally the conclusion in a different colour. At first students wanted to highlight whole paragraphs, but after discussion we were able to identify just the main points. They can use this information to fill in their Narrative Framework. From there they can add more detail and eventually share it to Pages for final editing. A target group of children will be expected to do this every time they start writing a narrative on a new myth or legend.
 Most of the students like to publish their work in Book Creator, but from tomorrow I am going to introduce them to more ways. I am going to take one student's piece of writing and present it in several different ways. As they decide what they want to use, I will only show those students how to get started and they will become my teachers for the rest of the other children when they are ready to learn how to do it.
Sometimes an iPad alone is not enough (4 devices, 2 students!)
 The parents came in today and were able to see the children at work. They were able to see students
It's not all about iPads!
 This student is reading her next Myth and 'writing' down the facts/information on a piece of paper!Day Seven
I tried out a couple of new ideas today with the students. I noticed that some of the students were having problems sequencing in order and identifying the main points in a story. I ran a workshop session where they copied the story Dionysus and Ariadne from the website and pasted into Notability.
I then showed the Narrative Framework on the Projector which has been made in Inspiration.
I asked the students to highlight 'Who' were the main characters in Green.

 They then had to highlight the 'Where', 'When' and 'What' in different colours. After that we identified what the main problem/conflict was by highlighting in red. We then went on to highlight in blue the main points in the story and finally the conclusion in a different colour. At first students wanted to highlight whole paragraphs, but after discussion we were able to identify just the main points. They can use this information to fill in their Narrative Framework. From there they can add more detail and eventually share it to Pages for final editing. A target group of children will be expected to do this every time they start writing a narrative on a new myth or legend. Most of the students like to publish their work in Book Creator, but from tomorrow I am going to introduce them to more ways. I am going to take one student's piece of writing and present it in several different ways. As they decide what they want to use, I will only show those students how to get started and they will become my teachers for the rest of the other children when they are ready to learn how to do it.
Below is a Slideshare I have created that shows different ways students can publish the same piece of writing using one of the student's own writing as an example.
Sometimes an iPad alone is not enough (4 devices, 2 students!)

- writing in Graphic Organisers
- editing by developing their ideas in Pages
- proofreading by checking their learning intentions and success criteria
- publishing in a variety of ways
- observing the teacher as she held conferencing sessions with the students as they talked about their writing

So over a two week period a variety of apps were used and the students became very proficient at using them to create their writing. Laptops were used quite extensively as well which indicates that iPads alone are not enough. In this post I have mainly concentrated on iPads but if I was full time in the class there would be a balance of non digital writing and creation as well because it is a choice that is available to students.
What didn't work so well?:
What worked really well?:
What didn't work so well?:
- Tables in Google Docs. If you want students to edit easily then do not put tables into your docs
What worked really well?:
- students having access to their Writing Assessment so that they could check off that they were following their success criteria
- mirroring iPads through Apple TV onto the TV screen and a group of students peer editing
- showing a small group of students (in less than 5 minutes) how to do something with an app and then they teach the other students
- having the links to the Graphic Organisers on the class wiki page
- students having a quick access link to their Assessment and to the wiki on their home screens of their iPads
- students having a choice about the tools (digital or non digital) they are going to use for their learning
Tuesday, 20 August 2013
It's all about finding the right tool #1
I have had a lot of teachers asking me recently how can they use their iPads more creatively with the children. This will be the first of many posts, as teachers ask I will post the ideas I have had. My first question is what topic are you doing?
Topic?
Aboriginal Art
What apps are on your iPad?


How can you use these apps?
Use Drawing Pad to create your own Aboriginal Art. Choose the black paper and the Felt tip to create patterns.
Share back to your photo album and insert into
Keynote, Comic Life, Pages or Book Creator - make a presentation of your own art, some examples of Aboriginal art you have found, information about the art,
Safari - Find images via Google, tap and hold on an image to either copy or save to Camera Roll. Don't forget to reference where the images came from.
 Comic Life: choose the blank template then choose Collection under the Layout tab and tap on Maps layout, choose Australia and tap the photo icon in the centre of the map to insert your your own art work. Use Text boxes and picture boxes to cover up the parts of the map that shows other countries.
Topic?
Aboriginal Art
What apps are on your iPad?


How can you use these apps?
Use Drawing Pad to create your own Aboriginal Art. Choose the black paper and the Felt tip to create patterns.
Share back to your photo album and insert into
Keynote, Comic Life, Pages or Book Creator - make a presentation of your own art, some examples of Aboriginal art you have found, information about the art,
Safari - Find images via Google, tap and hold on an image to either copy or save to Camera Roll. Don't forget to reference where the images came from.

Friday, 23 November 2012
Motivating writing using Apple Mac's Keynote
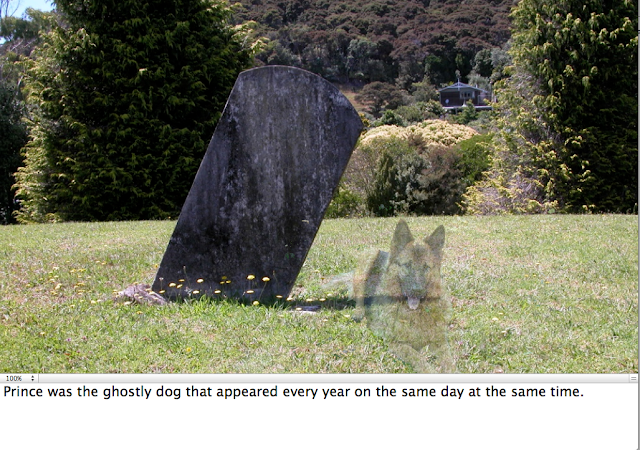
I was playing around with photos with a teacher today and showing her how to do masking and Alpha masking. When you do the alpha masking you need a fairly plain background.


I used this photograph of my dog and then removed the background green of the grass by clicking on the Alpha button on the toolbar.


Then I dragged another photo of scenery (a photo I took at Cooks Beach) on top of the dog and sent the background to the back.

The next step was to click on the dog and change the Opacity so he looks ghostly.
I then went to View - Show Presenter notes and now students can write their stories about the picture.
Take a screen capture of the photo and add it to a Presentation in Google Docs. Make a file up different pictures.


I used this photograph of my dog and then removed the background green of the grass by clicking on the Alpha button on the toolbar.

Then I dragged another photo of scenery (a photo I took at Cooks Beach) on top of the dog and sent the background to the back.

The next step was to click on the dog and change the Opacity so he looks ghostly.
I then went to View - Show Presenter notes and now students can write their stories about the picture.

Take a screen capture of the photo and add it to a Presentation in Google Docs. Make a file up different pictures.
Thursday, 23 August 2012
Turning a Projector into Learning Centre activity with Juniors
Continuing with using PowerPoint or Keynote in a different way, I was working with a teacher in a school that has intermittent internet access, 2 computers that work sometimes, and she has a projector that she uses in a limited way.
I suggested using the Projector and her laptop as a learning centre activity area. I showed her that she could adapt some of her printed activities for visual interactive learning by creating them in PowerPoint or Keynote as the example below shows.
Students can go to the centre and use Whiteboard markers to write the letters, a buddy can check to see if they are right, another child can move the slides with the arrow key on the keyboard. And the teacher can keep an eye on what the students are doing because it is on the Whiteboard through the projector. You are now making use of technology with students in control!
Wednesday, 21 September 2011
Infographics and Inquiry Presenting
All of my schools at the present are embroiled in Rugby World Cup fever. Students are researching and finding out information not only about their own country but also adopted countries. Soon they will need to present this information so I have been talking to teachers about how 'Infographics' are a great way to present student work.
Students will have created their research question, found their keywords and used the smart researcher tools to find information.
They will have copied photos or graphics to folders and the internet references to WordProcessor (Word, Pages, Google Docs) along with 'brief' notes copied from Internet pages that answer their research question. They will synthesise their notes and present facts and 'hopefully' they will present new ideas with conclusions and inferences.


I am gradually adding examples to Scoop.it that are suitable to show younger students.
Click on this link to see examples suitable to show students.
I will be following up with more posts on this subject as I develop ways of how to teach students how to find the right sort of information, graphics, symbols etc to suit their presentations.
Students will have created their research question, found their keywords and used the smart researcher tools to find information.
They will have copied photos or graphics to folders and the internet references to WordProcessor (Word, Pages, Google Docs) along with 'brief' notes copied from Internet pages that answer their research question. They will synthesise their notes and present facts and 'hopefully' they will present new ideas with conclusions and inferences.
Now how could they present it?
The following example has been created in Comiclife.

Or in PowerPoint

Or in Keynote

The following diagram lists all of the possible elements that could be included in an infographic

Or in Keynote

The following diagram lists all of the possible elements that could be included in an infographic

The criteria for an infographic presentation is
- Keep a balance between graphics, text, charts and numbers
- Be aware of what colours work well together, not too many and remember complimentary colours (opposites of the colour wheel)
- Check all of the time that you are answering your research question
- Reference your facts, graphics etc
- Include graphics, photos, graphs, flow charts, graphic organisers, statistics
- Add your own inferences from the information presented
For younger children you can simplify the criteria

Some of the programmes that would be suitable for creating infographics
- PowerPoint: more suitable then Word as all of the different objects will not move around randomly + version 2007 and 2010 have great Smart Art graphics
- Pages or Keynote (for Mac): easy to move objects around and place them
- ComicLife: great Title graphics, easy to create 'Chart' type infographics
- Kidspiration and Inspiration: Mindmapping type infographics
I am gradually adding examples to Scoop.it that are suitable to show younger students.
Click on this link to see examples suitable to show students.
Thursday, 19 May 2011
Publishing Junior stories
One of my junior teachers has had a frustrating time trying to publish her Year one students' stories. She uses Word and has a frame for her Picture box and a text box below that for the story. After she has saved 24 pages of this format and typed in her students' stories, text boxes and frames have moved and she has the tiresome task of moving all the boxes in place again. She asked if there was a way of anchoring the text boxes, but unfortunately there is not. So I came up with the idea of making a PowerPoint Template.


 Once you have the template looking the way you want it, then duplicate the slide by clicking on it once in the slide tray, Press Ctrl D or Command D however many times you need copies.
 Go File - Save as and Choose Template from the dropdown menu. Make sure that you know where it is saving to as when you choose 'Template' it defaults back to Template folder.
Now when this teacher publishes her students' work, she can open up this template, type in the stories, no text boxes will move around and she can print it out for the students to illustrate. Once she saves it, she still has the blank template to use over again.


- Open up PowerPoint, choose plain template
- Go to File - Page Setup and change Page Orientation to Portrait
- Next choose a Layout, choose one with a Text box space, she deleted the title
- Next resize the text box and add a square shape for the picture box, move them to where you want them, set your font and size
- Remove the bullet points from text by clicking on the bullet point button on toolbar
- Last step is fix the rulers, because when you remove the bullet point the second line of text indents and you need to fix that


Now when this teacher publishes her students' work, she can open up this template, type in the stories, no text boxes will move around and she can print it out for the students to illustrate. Once she saves it, she still has the blank template to use over again.
Saturday, 15 August 2009
Inanimate Alice - Multimedia Fiction and Networked Novels
Came across this site Inanimate Alice and I was overwhelmed with ideas of how to use this in a classroom situation. Inanimate Alice is an interactive multimedia story (known as Transmedia, storytelling across multi media platforms) that grows as the main character gets older. The story starts in a simplistic way and gradually increases in readability and game challenge levels. There are 10 levels, four that have been released so far with Episode 5 coming sometime before the end of the year. All these episodes can be viewed for free!
What I liked about it was how it would appeal to visual learners and non-readers alike. Apart from reading, this is also a fantastic motivator for writing and publishing. I recently wrote a post about 'PowerPoints can be great' and this way of presenting a story lends itself (in simplistic terms for young children) as one that could be created in PowerPoint or Keynote because of the hyperlinking abilities. MovieMaker or iMovie could be used as well more so for the animated effects that could be added.
Have a look at this wiki Digital Literacy -Inanimate Alice, (Pascoevale Primary School) there are some fantastic examples of episodes students have written using PowerPoint.
Flight Paths by the same authors is a Networked Novel where readers can participate by adding fragments, ideas or chapters. Again, these stories would be great motivators for writing.

Ways to use this in your classroom
Teachers can request the comprehensive Education Pack which has lesson plans and resource pack. There is also an Education pack available for the iStori.es, an authoring tool.
What is important to note here is that the Multimedia fiction story cannot exist without the writing; that is what makes it powerful. There are striking images coming at you, but the writing is what leads you on, to think, predict, question and wonder what is next.
I believe that this genre of writing and reading is an important development in our literacy programme.
What I liked about it was how it would appeal to visual learners and non-readers alike. Apart from reading, this is also a fantastic motivator for writing and publishing. I recently wrote a post about 'PowerPoints can be great' and this way of presenting a story lends itself (in simplistic terms for young children) as one that could be created in PowerPoint or Keynote because of the hyperlinking abilities. MovieMaker or iMovie could be used as well more so for the animated effects that could be added.
Have a look at this wiki Digital Literacy -Inanimate Alice, (Pascoevale Primary School) there are some fantastic examples of episodes students have written using PowerPoint.
Flight Paths by the same authors is a Networked Novel where readers can participate by adding fragments, ideas or chapters. Again, these stories would be great motivators for writing.
Ways to use this in your classroom
- create their own version of the story making themselves the main character
- take one of the main characters of 'Inanimate Alice' and build a story around that character and their adventures
- continue the story and create different chapters in different countries including details that pertain to the culture of that country
- use special effects of photo editing software (Befunky, Fotoflexer, Lunapic, Picnik, Aviary) for the photos on their story
- retell the story from another perspective
Teachers can request the comprehensive Education Pack which has lesson plans and resource pack. There is also an Education pack available for the iStori.es, an authoring tool.
What is important to note here is that the Multimedia fiction story cannot exist without the writing; that is what makes it powerful. There are striking images coming at you, but the writing is what leads you on, to think, predict, question and wonder what is next.
I believe that this genre of writing and reading is an important development in our literacy programme.
Wednesday, 4 March 2009
Wednesday, 19 November 2008
Comic Life and Slideshows

You can make slideshows of comic pages in comic life. Before you start turn the page to horizontal. Go to File - Page Format, click on Landscape.
If this Library is not showing then click on the drop down menu and select Built in basic.
Click on the 'One' template and drag and drop on the page.
Drag your Photo in and add your text bubbles, headings and narrative text.
Add more pages with either 'One' template or with a template that has 2 or 3 spaces on it.
 Once you have completed all your pages and saved them, then export them as individual jpegs. Go to File - Export - Export to Images.
The individual pages will be exported as separate jpegs.
These can now be imported into Photo Story, MovieMaker, Keynote or PowerPoint. Add music and you have a comic slideshow.
Wednesday, 4 June 2008
Slideshare
Slideshare is a programme where you can share your PowerPoint or Keynote presentations. You can save them as .pps, .ppt or pdf. This is an ideal tool for children to showcase their presentations online in a wiki or a blog publishing their writing or sharing their findings on a research .
Subscribe to:
Posts (Atom)