Add Youtube movies or Vimeo, add pictures from your computer, photos from Flickr streams, Google Maps and text. Export to Youtube and then embed in wikis and blogs.
Andrew wanted to showcase his students 'Photos of the Day'. He thought about just uploading the photos to a wikipage. I suggested he created a Google Presentation, embed it on the Wiki with a link.
So when the students upload their photos to the Google presentation they will be updated on the Class wiki.
Photobucket is an online storage site for your photos, it is a one stop place where you can edit and create slideshows. Upload photos to Photobucket.
Media: Upload your photos, create albums, view as slideshow, get embed code to add to blogs or wikis
Themes: Change the theme of your Media page Organise: organise your photos into albums Editphotos: Fotoflexer is integrated into Photobucket so that you can edit photos. Tags: add tags to photos PhotoProducts: for a price turn your photos into cups, calendars, books etc Tools: Create interesting slideshows using filters and themes
The standard Animoto website allows you to make 30 second videos for free with about 12 items (photos or video clips). Add text over slides and spotlight the special slides. Add music by choosing tracks available from the Animoto library or upload from your own computer. Once the movie is generated it can be uploaded to Facebook, Twitter, or any social networking site, and it can be embedded in blogs and wikis.
Animoto for Educators allows more choices. Click on the Apply button to lodge an application for Animoto for Educators. Create longer videos and export to Youtube or download to your own computer.
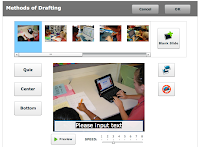
PhotoPeach allows you to make slideshows out of photos, add captions to each slide, add music and then finally add a quiz to the end of the slideshow. Once the slideshow is finished, the viewers can leave a comment in the comment box. You need to sign up for an account first.
Step One: Upload photos Step Two: Arrange your images into the order you want to present them Step Three: Type in a title and choose your music. There is a choice of instrumental, classic, search YouTube or upload your own Step Four: Click Finish Step Five: Play the slideshow and add captions by clicking on Add caption Step Six: Type in the caption, choose where you want to place it 'Center or Bottom' Step Seven: Click on the next photo and add a caption, repeat with all of the photos
Step Eight: Finally, add a quiz by adding first a blank slide and then click on the Quiz button. Type in the Quiz. Complete the slideshow by clicking on OK at the top of the page.
There are several ways of sharing your slideshow. Email to friends, upload to Facebook, MySpace, add a link to Twitter, embed a copy into your wiki or blog or copy a link to the slideshow that could be inserted into PowerPoint,Word, Keynote, Pages, Zoho or Google Docs.
Set up an account, upload animated PowerPoints with sounds, video, links, buttons and transitions to SlideBoom. Embed in blogs and wikis. Students will need to critique their PowerPoints before uploading, remind them that 'less is more' when adding effects to their slideshows.
Moblyng is free software that you can upload your photos to, organise them in many different formats, add music and titles if you wish and then embed the code into blogs or Wikis. I have used it here to showcase how some students I worked with recently took their own photographs after watching a slideshow I had made about 'How Kids can take great Photos' You need to register first and set up an account before you can save the slideshow to get the embed code.
Animotois slideshow creator that animates your photos. This example has PowerPoint slides saved as jpegs. There are also some microsoft clipart examples of bees.
Slideshareis a programme where you can share your PowerPointor Keynote presentations. You can save them as .pps, .ppt or pdf. This is an ideal tool for children to showcase their presentations online in a wiki or a blog publishing their writing or sharing their findings on a research .
This is Mapwing. A programme that enables you to create a virtual tour from photos and images. Create a map background, then add pins to pinpoint areas you would like people to look at. Add photos and text (descriptions, information etc) to those areas. Embed into a wiki, or a website.
Voicethreadis a collaborative space of group conversations. The example below is created by a student called Zoe in America, she designed it around her interest in Global Warming.
A VoiceThread can be created using documents, videos and photos. Comments can be added by registered users by text or voice.
They can be exported to your computer as a widescreen movie and to wikis, blogs and webpages. You can use a variety of images: JPG, GIF, BMP, PNG; docs: PPT, PPS, PDF, DOC, XLS; and videos. If you've got a Flickr account, you can import from those as well. It has a 'doodle' feature which means you can draw over the images to make a point while you are recording your voice. Classroom Application: a way for children within the class to collaboratively present
an investigation
book report
any writing genre (recounts, reports, explanations, descriptions, procedural etc)
technology challenge
Or for children as in Zoe's example to invite experts outside of the classroom environment to comment or answer questions
Sketchcast is an online drawing and writing programme. This is a great way to record your voice, draw pictures and type text realtime and then play it back as a movie. You can stop and start the recording at anytime, it can be embedded in a blog or a wiki, or can be viewed through your account. What are the applications for the classroom?
Found this site http://www.slide.com/ that make slideshows of your photos, great for showing off a series of photos in a blog. Click on Slideshows to make the slideshow, select the Browse button choose photos from your hardrive by holding down the Ctrl Key and click OK. Choose from the choices of how you want your slideshow to look. The slideshow above has been created in a Puzzle format and the one below is sliding. Other formats available are Collage, Melt, News etc.
Run your mouse without clicking over the slideshow to make it move. Another way of publishing photos in a comic strip is using Bubblr. Search for photos in Flickr by typing in a search word or a user name. Drag the photos you want to use down into the panels, drag the speech bubbles up and type in words. click on After Current to add more photos, click Publish when you are finished. This comic strip will be saved and then you can make the choice of emailing, adding to a blog site or printing. This could be a great way to motivate reluctant writers as they can search for photos that interest them or they could be photos on certain topics. Be aware though that it is possible to get questionable photos if you type inappropriate words.