I have been working in a lot of Junior Classrooms lately and what I have noticed is that teachers need activities to reinforce what they are teaching in early phonics and handwriting. I have pulled together some of my existing updated resources and lots of new ones and added them to my TPT store. When looking up my name, filter to the most recent. Some of these activities are ideal to teach with in small groups, but most can be used for independent work. I hope these will be helpful.
Showing posts with label juniors. Show all posts
Showing posts with label juniors. Show all posts
Sunday, 23 June 2024
Saturday, 10 November 2012
Starting younger children reflecting
Kids Journal ($1.29 for iPad)
Diary writing, reflective journal for young students.
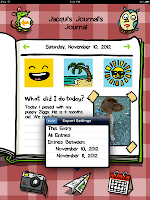
This is a great app to start young children reflecting on their day. It can be used for for individual iPad owners and you can set up class sets of journals on one iPad.

Tap on the empty Journal box to add a new journal.
Add a photo, type in your name and choose a colour for your book.

Choose a Mood Picture
Choose a location picture

Choose a weather picture
Choose the 'Photo of the day'
Type in your reflection/journal/diary entry

These pages can be exported by tapping on the Paper Dart icon. They can be exported to iBooks, Kindle, Notability, Evernote and several more.
So it takes 5 steps to make a Journal entry
 The next step could be Kidblog which is an Internet based student blogging platform and which is now available as an app
Kidblog (Free for iPhone/iPod Touch; Free for iPad)
And then there is Blogger, if your students have a Google account through Google Apps for Education then they have a 'Blogger' account. It is a great way for students to blog as there are no distractions on the app, all they can do is type a title, type a post, insert a photo and post!
Diary writing, reflective journal for young students.
This is a great app to start young children reflecting on their day. It can be used for for individual iPad owners and you can set up class sets of journals on one iPad.

Tap on the empty Journal box to add a new journal.
Add a photo, type in your name and choose a colour for your book.

Choose a Mood Picture
Choose a location picture

Choose a weather picture
Choose the 'Photo of the day'
Type in your reflection/journal/diary entry

These pages can be exported by tapping on the Paper Dart icon. They can be exported to iBooks, Kindle, Notability, Evernote and several more.
So it takes 5 steps to make a Journal entry
- Choose a mood
- Chose a location
- Choose the weather
- Choose a photo
- Type in your entry
 The next step could be Kidblog which is an Internet based student blogging platform and which is now available as an app
Kidblog (Free for iPhone/iPod Touch; Free for iPad)
And then there is Blogger, if your students have a Google account through Google Apps for Education then they have a 'Blogger' account. It is a great way for students to blog as there are no distractions on the app, all they can do is type a title, type a post, insert a photo and post!
 |
| 5 year old Chloe, doing her favourite thing...blogging on Blogger |
Sunday, 7 October 2012
Junior Digital Toolkit for Writing
There are so many digital tools available to students.
How can you manage them?
Which is the best tool?
How can we share them out?
How can we remember to use them?
I have talked a lot about the necessity of students having their own 'Digital Toolkit'.
The diagram below shows an example of an overall 'Junior Digital Toolkit'.
There are 3 main digital tools
And then I have done the same with the iPad/iPod Touch
As the students progress and become more proficient, I would add more software and apps tools until they have a wide selection and choice about what they could use.
Now let's put this into practice. Below is the Writers Digital Toolkit at the beginning of the year
Students are clearly able to see what their choices are for when Drafting and Publishing.
As the year moves on, more apps, software and online tools can be added.
There needs to be a monitoring system put in place to see what students are using. For very young children I might have a Sticker chart.
For older, more independent students I would have individual Check lists that are either kept in a Clearfile folder or as a Google Doc.
Putting management techniques such as this in place teaches students to be independent, collaborative and self managing. Students need to know what is available for them to use and that they have a choice in the way they want to learn.
How can you manage them?
Which is the best tool?
How can we share them out?
How can we remember to use them?
I have talked a lot about the necessity of students having their own 'Digital Toolkit'.
- They need to know what is available
- They need to know 'how' they can use this toolkit
The diagram below shows an example of an overall 'Junior Digital Toolkit'.
There are 3 main digital tools
- Laptop
- iPad/iPod Touch
- Easi Speak
Writing stories - Kidspiration or Pages
Playing Games -Wiki
Make Movies - iMovie
Writing stories - Notes or Pages
Drawing - Create a draw
Making Music - Garageband
As the students progress and become more proficient, I would add more software and apps tools until they have a wide selection and choice about what they could use.
Now let's put this into practice. Below is the Writers Digital Toolkit at the beginning of the year
As the year moves on, more apps, software and online tools can be added.
Labels:
digital toolkit,
Drafting,
juniors,
management,
selfmanaging,
Writing
Thursday, 22 April 2010
PowerPoint as a modelling and teaching tool
I was helping a teacher with ideas of how to integrate ICT into her classroom programme. I asked her what her shared book was and suggested how she could teach 'Shared Book' using the class computer and a group of children. (Read the Shared book with the children first)
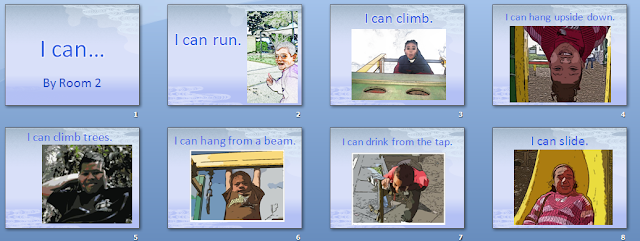 All this was part of their shared book learning experience, and put their learning into an integrated, authentic context. They now have this story on the computer as an extra reading activity.
As a follow up to this, students can take photos of other things they 'can' do and add them to this shared book or create an new one.
- Start off with a blank page, introduce the shared book, ask what the title is, type the Title in
- in the sub title box type by Room #
- Insert a new slide
- Read the text from the Shared book and then start typing it in
- ask questions like "What do I need to type first?" "What goes at the end of the sentence?"
- Computer skills are taught as they are needed i.e. "How do I make a capital letter?" "Who can show me how to type a full stop, what finger should I use?
- As the book was one about 'I can run, I can draw' etc. The teacher taught the children how to take photos, so these 5 and 6 year olds took their own photos and the teacher inserted them into their PowerPoint.
- To finish it off she chose a design template and this was all done as part of the lesson with the children participating alongside.
 All this was part of their shared book learning experience, and put their learning into an integrated, authentic context. They now have this story on the computer as an extra reading activity.
As a follow up to this, students can take photos of other things they 'can' do and add them to this shared book or create an new one.
Labels:
juniors,
literacy,
PowerPoint,
reading,
shared book
Saturday, 13 March 2010
Lab lessons with Juniors
I was working with a computer lab teacher today looking at ways to work with students. She had a class of Year one students came in!
You need to put some sanity saving measures in when working with a class of 5 and 6 year olds in a lab. They can't sit for long, because they are too excited, so it is best to get them on the computers straight away. If possible don't have them sharing as their collaborative skills at this age aren't that great!
Beforehand you will have needed to teach a couple (or more) of more able students to help the others to log on, and then click on the programme they are going to be using i.e KidPix or Paint. Let them go for it, experimenting with the tools or doing their favourite thing. Once everybody is logged on and in the programme, THEN you can start to add some order to your lessons.
The following are the stages you could go through with Juniors
These happen over several sessions!
Mouse Practice
You need to put some sanity saving measures in when working with a class of 5 and 6 year olds in a lab. They can't sit for long, because they are too excited, so it is best to get them on the computers straight away. If possible don't have them sharing as their collaborative skills at this age aren't that great!
Beforehand you will have needed to teach a couple (or more) of more able students to help the others to log on, and then click on the programme they are going to be using i.e KidPix or Paint. Let them go for it, experimenting with the tools or doing their favourite thing. Once everybody is logged on and in the programme, THEN you can start to add some order to your lessons.
The following are the stages you could go through with Juniors
These happen over several sessions!
- free play
- while they are in free play, work with individuals showing them a new tool i.e dragging background pictures and adding stamps
- show them the typing tool and type their name (you will need a display on a wall that shows the Upper and Lower case letters for those who haven't mastered them yet)
- type the words they know how to write (have high frequency words on the wall for students to look at)
- first official lesson can be drawing a picture about their topic or what they are writing about in their classroom LIMIT THE TOOLS! Pencil and Paint Can ONLY
- Repeat this session many times but bring something new in when the students look ready for it like typing your name (I also teach new things to students who look like they are capable of it as I walk around)
- next session might be typing a sentence
- at some stage teach the more able students how to save (they will help you to save students work)

- once the students are used to all these steps then you might introduce a new programme/Application
- at the same time talk to the students about the magic line, put two hands on the keyboard, this hand can't cross over this side of the magic line and the other hand can't cross over that side of the magic line (I put little pieces of folded paper between the keys to create a magic line)
- draw a picture for their story
- Type a heading for their story that could be printed out
- find a picture in Kidpix that could be printed out
- always remind them of the magic line
- thumbs only on the space bar
- pinkies only on the delete key
- rest fingers on the home keys (those students whose fingers can reach and are ready for it)
Mouse Practice
Mouse Practice PowerPoint Show version
View more presentations from Jacqui Sharp.
To make these Learning Centres follow these instructions
Finally, limit the time students are on the computers, 30 minutes is plenty of time for younger children to be staring at screen. If you have extra time over, then bring out the cameras and take photos that could be used for motivational writing or for publishing their work.
Just remember at this age more than any other age, the students will develop their skills at differing speeds...some a LOT faster than others. Identify those children that have those skills and use them to help you to teach the others. You will find that children learn best from each other!
Labels:
juniors,
keyboarding,
KidPix,
Kidspiration,
literacy,
magicline,
PowerPoint
Wednesday, 10 March 2010
Researching smarter
There are still a lot of teachers that are sending children off to do 'research' on Google using one key word.i.e bird (253 million hits later). When they finally find a page that has the information they want, it is invariably printed out, and trawled through looking for information.
1. have at least 3 key words if you are looking for information on birds, what sort of birds are you looking for, what country etc so now the Google search becomes 'bird native wading' and because we want to search for New Zealand Birds we click on pages from New Zealand.
Now we have 10,400 hits!
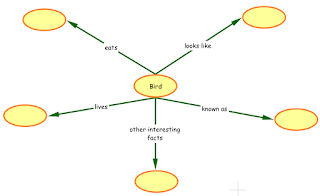
2. Open up a mindmap/Graphic Organiser (I like to use Kidspiration or Inspiration, or you can use online versions) Create a simple mindmap
3. Go back to the internet site you have chosen, press Ctrl F (Command F for Macs) type in one of the key words from questions in mindmap like 'eats'
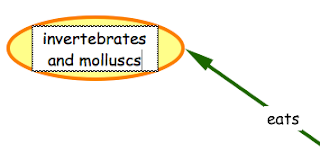
4. The word eat did not appear on my page so I used a synonym such as feed, click the next button to see each instance of the word feed until you see a sentence that will answer your question
5. Go back to your mindmap and type in the information you found
6. Go between the Internet site and the mindmap adding information
7. Add a picture to your mindmap by right clicking on a picture in your internet page, select Copy Image, go back to mindmap and paste (Ctrl V)
8. Don't forget to reference where information and picture came from
Model this way of researching to your class.
Use this model in all curriculum areas.
Become a smarter researcher yourself and your students will follow!
This is long, tedious, boring and usually irrelevant!
Become a smart researcher with some of these strategies1. have at least 3 key words if you are looking for information on birds, what sort of birds are you looking for, what country etc so now the Google search becomes 'bird native wading' and because we want to search for New Zealand Birds we click on pages from New Zealand.
Now we have 10,400 hits!
2. Open up a mindmap/Graphic Organiser (I like to use Kidspiration or Inspiration, or you can use online versions) Create a simple mindmap
3. Go back to the internet site you have chosen, press Ctrl F (Command F for Macs) type in one of the key words from questions in mindmap like 'eats'

4. The word eat did not appear on my page so I used a synonym such as feed, click the next button to see each instance of the word feed until you see a sentence that will answer your question
5. Go back to your mindmap and type in the information you found
6. Go between the Internet site and the mindmap adding information
7. Add a picture to your mindmap by right clicking on a picture in your internet page, select Copy Image, go back to mindmap and paste (Ctrl V)
8. Don't forget to reference where information and picture came from
Model this way of researching to your class.
Use this model in all curriculum areas.
Become a smarter researcher yourself and your students will follow!
Labels:
Google,
internet,
juniors,
Kidspiration,
research
Wednesday, 3 March 2010
Simple but an effective way of Publishing
A teacher said to me today that her children were always publishing in the same way, in Word with a frame and a title. She wanted to know some different ways to publish. I showed her my slideshare presentation '59 ways to publish'
Journal Publish
We decided to keep it simple and look at only using Word and PowerPoint. We looked at the Journal story idea. When you look at school journals, most of the pages have pictures in the background and text overlaying the page.
This is an example of two Word pages side by side. The photos cover the whole page, some of the photos have been lightened with the Washout button and then text has been inserted using textboxes. (Remove the background colour and line from the textbox by clicking on the Fill can and selecting 'No Fill' and the outline shape or line button and select no outline or line).
One single PowerPoint page can be used for publishing as well. Open PowerPoint, choose a design theme.
Select a slide layout, type in text, add graphics. Print out single page.
You can adjust the colours of the template by
Mac: Open the Toolbox and choose a colour theme from Document Theme
Windows: PowerPoint 2007 choose from Colours
Journal Publish
We decided to keep it simple and look at only using Word and PowerPoint. We looked at the Journal story idea. When you look at school journals, most of the pages have pictures in the background and text overlaying the page.
This is an example of two Word pages side by side. The photos cover the whole page, some of the photos have been lightened with the Washout button and then text has been inserted using textboxes. (Remove the background colour and line from the textbox by clicking on the Fill can and selecting 'No Fill' and the outline shape or line button and select no outline or line).
Publishing using PowerPoint Templates
One single PowerPoint page can be used for publishing as well. Open PowerPoint, choose a design theme.
Select a slide layout, type in text, add graphics. Print out single page.
You can adjust the colours of the template by
Mac: Open the Toolbox and choose a colour theme from Document Theme
Windows: PowerPoint 2007 choose from Colours
Labels:
juniors,
literacy,
PowerPoint,
Publishing,
Word
Saturday, 17 October 2009
Where the Wild Things are
Where the Wild Things are is an old favourite book of mine and one that I have used with classes many times. The movie is due out on the 3 December 2009 (in NZ) which will renew interest in this old classic. A few years ago I developed some activities using the context of the book and integrated it into the maths we were doing at the time; tessellations and rotation. The skills students learned from working with shapes enabled them create their own Wild Things.
Build a Story: Activity Six
A to Z of Wild Things: An example
Build a Story: Activity Six
A to Z of Wild Things: An example
Wednesday, 7 October 2009
Editing Writing, Telescopic Text and Magnetic Writing
Teachers want to know ways to engage students in editing their own writing. If you have a projector, whiteboard (or even better an IWB) try this.
Start off with Joe Davis's site http://www.telescopictext.com/
I ask students to describe what the tea could taste like, write some answers above the text, then click on the word 'tea'. New text will be inserted into the sentence.
We carry on in this mode predicting, describing and analysing the new edited text until we can go no further.
The next day we can look at this website which is based on Joe Davis's site http://basseq.com/fun/telescopictext/
Now we can add our own words by replacing the text that is already there by highlighting the word to be changed, click on Replace, type new word and then click on Submit changes.
The third day can then be spent looking at Tripticos Word Magnet site.
Type in a sentence. When you type in the full stop make sure there is a space between it and the last word.
Click Next.
 In the next window you can choose from many different backgrounds but for my editing lesson I will keep to a blank page
Click on Done and the next page will appear with your text broken up into text boxes. Click and drag them up to make a sentence.
Now start adding new words by typing in the 'Add new magnet box', once you have clicked the + symbol, click on a colour to change the colour of your text box. Drag it into the correct place. Use the colour coding to identify adjectives, conjunctions etc.
This is a great way to get students interested in editing their work and to see how a sentence can come alive. These are the type of activities that I like to use with children as part of my modelling and teaching.
This will work well with just a projector and computer, but the Interactive Whiteboard would allow students to take over the manipulation of text and objects.
Start off with Joe Davis's site http://www.telescopictext.com/
I ask students to describe what the tea could taste like, write some answers above the text, then click on the word 'tea'. New text will be inserted into the sentence.
We carry on in this mode predicting, describing and analysing the new edited text until we can go no further.
The next day we can look at this website which is based on Joe Davis's site http://basseq.com/fun/telescopictext/
Now we can add our own words by replacing the text that is already there by highlighting the word to be changed, click on Replace, type new word and then click on Submit changes.
The third day can then be spent looking at Tripticos Word Magnet site.
Type in a sentence. When you type in the full stop make sure there is a space between it and the last word.
Click Next.
 In the next window you can choose from many different backgrounds but for my editing lesson I will keep to a blank page
Click on Done and the next page will appear with your text broken up into text boxes. Click and drag them up to make a sentence.
This is a great way to get students interested in editing their work and to see how a sentence can come alive. These are the type of activities that I like to use with children as part of my modelling and teaching.
This will work well with just a projector and computer, but the Interactive Whiteboard would allow students to take over the manipulation of text and objects.
Labels:
interactive whiteboards,
juniors,
literacy,
Writing
Sunday, 13 September 2009
47 Ways to publish Students' writing
This is an update to a previous slideshow I had made on publishing students writing. This has more activities and explanations for teachers how to use in the classroom.
Wednesday, 26 August 2009
Number Knowledge, Basic Facts and PowerPoint
 I was working with Jenny today at her school, and she was telling me that the problem she has with Number Knowledge is that children do not know their basic facts and this is throughout the school.
 She wanted to create flash cards quickly, so I suggested making them in PowerPoint.
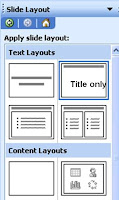
Choose the Title Only slide from the Slide layout.
Drag the title bar down so it is in the centre of the slide.
Type in the number sentence, insert a square shape from AutoShapes (Shapes).
Resize everything so it fits in the slide
Click on the slide in the Slide Panel, press Ctrl D (Command D for Apple) to duplicate the slide.
Change the numbers and box around, repeat once more until you have 3 slides.
Shift click all 3 slides and then duplicate. Change all the numbers. Repeat this last step until all of the Flash cards have been made.
When printing make sure you select the Handouts - Slides per page 6
Cut out, write the answer on the back, laminate and bag the cards.
The PowerPoints can be used as a computer activity as well. Duplicate each slide and type in the answer, resave as an activity. In Normal view, students click on the box and type in the answer or in Slideshow View they can use the pencil to draw the answer. The next slide will have the answer for them.
Make a series of cards and games and organise them into
- Doubles (to 10) (more than 10)
- Bonds to 10 (creates 10 i.e. 7 +3, 6 +4),
- Combinations up to 5, (a total less than or including 5)
Subscribe to:
Posts (Atom)


