One of the activities I timetable children to do each day before school is to find out what happened on this day in History. Some of the sites I had been using were American (and were the day before, because of time difference).
Sometimes the information on those sites were not really appropriate for children in New Zealand. I came across this site New Zealand History online. What a great way to teach our students New Zealand history.
How to use in the Classroom IWB
Make a file using the notebook software of the IWB you are using. Add the links to the first page.
I also link to a weather site and current news site.
Students are timetabled (3 a day) to click on a link, read the page, decide which item they are going to copy and take a screen capture to a new page.
This becomes part of our oral language time in the morning where all 3 students have a chance to report back to the class what they have found out. They particularly like using the IWB to navigate to their pages and we always take the opportunity to use the highlighter pens to identify key words, nouns, great adjectives etc( what ever happens to be our focus at that time.)
Projector only
Make these links in a PowerPoint and hyperlink to the address or the pictures. When presenting back students click on the link and find the item they want to talk about.
No Projector or IWB
This still works well without a projector, students take notes of what they have found out and report back to the classroom. This is great activity for making sure that all children get hands on time using the computer and the internet every two weeks.
I have written a series of technology units that have an ICT focus and I am going to share them over the next few weeks.
The first one is Ancestral Seafarers. Students will use Google Sketchup, Digital Lego and Paint as some of the ICT tools.
This unit is designed to integrate into the main Science and Social studies focus. Setting: We have been looking at how the early Maori people migrated to New Zealand. They used many forms of navigation tools such as the stars, migrating birds and tidal flow. Brief: It is the year 2010; we have sophisticated technology available to use. If we were going to make the same trip and were able to use the technology available today to navigate, then what and how would we use it? Plan a model using Sketchup, Digital Lego or Paint and identify all of the technologies you have used. Specifications:
The boat you travel in can be no longer than 20 metres
You must justify the use of each technological item
'So canoe traditions do not only explain origins. They also express authority and identity, and define tribal boundaries and relationships. They merge poetry and politics, history and myth, fact and legend' (retrieved from TeAra)
What does this mean? How can it relate to your own design?
Try out the tutorials in either Sketchup or Digital Lego
Draw your plan itemising all of the technological improvements that you will use for navigation.
Level 1: Describe your plan itemising all of the technological improvements that you will use for navigation.
Level 2: Present your plan to the class explaining the outcome you are developoing and describing the technological improvements
Level 3: Describe your outcome explaining how it will suit what you plan to do with it, identify the technological improvements and describe in detail how they will assist with the final outcome
Level 4: Identify what the need or opportunity was, describe the technological improvement and how it will benefit the stakeholders.
TeAra the The online Encyclopedia of New Zealand is a wonderful resource to start with when researching anything to do with New Zealand. TVNZ on demand is another valuable resource and Waka Hui had several episodes on Ancestral Seafarers.
There are only two weeks left until the end of the school year in New Zealand,
so it is time to start thinking about Christmas activities we could do with the students in our classes. Even though Christmas is during Summer we still adopt a lot of the Northern Hemisphere traditions and teach them in our classes. One noteable case last Christmas was showing the teacher of the bi-lingual Tongan unit how to make paper snowflakes online and offline!
The next few posts are going to concentrate on Christmas activities you can do in the classroom using computers.
Twelve Days of Christmas
This was a favourite activity I did with students every Christmas where we would
students could draw or paint pictures, take photos of final products
or use online programmes to create drawings such as Sketchfu ( need to set up an account, click on Download to see image and screen capture or print); Odopod is more suitable for older students, drawings look like watercolours; Sumo is more suitable for older children as it has quite comprehensive tools; Artpad is a simplistic art tool suitable for all ages, take screen captures of finished art work
other programmes that could be used are PhotoStory 3 (Windows only), Moviemaker (Windows) or iMovie (Mac) Insert photos, record voices or add a music track to create movie.
Inspiration or Kidspiration could be used for the mindmapping of the ideas and publishing as well. Both Kidspiration and Inspiration can be hyperlinked to websites, Inspiration can also have movies embedded on the page.
ComicLife is also another easy way to publish students work. Use their drawings or photograph artwork and add it to the comic.(If you are using images from online don't forget to reference!)
If you don't have ComicLife then use the Autoshapes in Word
A simple but fun activity for all ages is building a picture in Kerpoof and adding text, you can search for graphics and make it as unusual as you like. Print it orscreen capture it when finished.
Of course the ever popular Wordle should not be left out. Adding a Tilde ~ in between each word will allow phrases to appear. This is when children need to learn how to copy and paste as there is a lot of repetition going on.
Themes
Different themes could be decided on. There are different schools of thought on the original meaning of the song. Here are some ideas for themes that could be used
characters and settings from a fairy tale or favourite book
indigenous items from the child's country of origin
favourite sports (teams)
international themes such as Global Warming, Third World countries, Disasters
based on a Social Studies/Science topic studied that year
presents they would like for Christmas
presents they would like to give for Christmas
based on people in the school/classroom
based on a favourite movie (See the youtube movies below)
look through a current magazine or newspaper
write about noteable school or personal events
How about a non-Christmas theme?
There maybe some students in your class who do not celebrate Christmas so they could have a theme about the holidays. I saw a great book in a classroom a few days ago called 'The Twelve Days of Holidays'. This is written from the mother's perspective as she is increasingly getting 'fed up' with her children at home during the holidays. Students could write about
the holiday they are going to have
their best holiday
their worst holiday
their dream holiday
or from the perspective of a member of their family
Other versions of 'The Twelve Days of Christmas' that can be viewed that could motivate students are the following
this one is a slideshow with pictures (paintings) of each day
This next Youtube movie is a good example of how you can create your own Twelve days of Christmas on a particular theme, in this case on Disney stories.
This version will appeal to Shrek fans. This is a great theme to use picking out characters in the movie.
And if you want to see the lyrics have a look at this Youtube movie
For more advanced ideas of presenting the twelve days of Christmas which could be embedded into Blogs and wikis...
Wallwisher: Add posts to the wall, could be an individual wall or a collaborative wall
Glogster a poster yourself application enables you to embed graphics, movies and link to websites.
Create an online book
Mixbook has some great Christmassy templates. Students can publish their Twelve Days of Christmas in Mixbook and then embed into their wiki or blog (for free). They can also be purchased from $6.99 US and sent to you.
There are a lot more online ways of presenting 'The Twelve Days of Christmas', for more ideas look at
Apture allows you to save webpages within your blog or wiki without leaving your site.
First you will need to download the plug in, click on Download Plugin. Select a blog type and then click on the Install the extension (in this example Firefox)
You will need to open a new post page and the extension will be added. Follow the instructions to activate the link. Highlight the text that will open up the Snapshot
Click on the Apture link button Paste in the URL address for the snapshot, click Go Choose whether you want an External Link or a snippet then click on Create Link
Hold your mouse over the Link below (don't click) to see the snapshot window
The mimioconnect site has just added a new content pack to add to their mimio notebook software. It is worth a download. It is called Graphic Organisers. It has some of the standard
Cause and Effect
Concept Wheel
KWL chart
Venn diagrams
and a few extra ones that can be adapted for classroom use.
Textoriser turns your pictures into words. In this example I have used the text from my ICT Teaching and Learning blog and my avatar. First download the software from Textorizer, install the software. Upload a picture.
To use your own text, copy the text into a Word/Pages file and save the file as a .txt. Click on the Change Text and browse to your text file. There are two choices of Textorizing, the one I prefer using is Textorizer Two.
You will need to play around with the the font scale and text size (drag the blue bars up and down like sliders). Click on Textorize when finished. Maximize your screen before taking a Screen Capture
Here is an example of the same graphic with slightly bigger text.
Here is an example of a Picture created in KidPix, saved as a jpeg. The text was typed in Word and saved as a text file. Here are 3 different examples where I have adjusted the font scale, text size and Line height. Click on each example to see the full image.
I have seen Wallwisher used in a few different ways by teachers, which has of course inspired me to write this post and come up with some more ideas of how to use it. So instead of writing the ideas in this post I have added them to the Wallwisher. Please feel free to add but additions are moderated. If I was using this with students in real time I would not moderate it until later. You do not have to set up an account, but for classroom use I would as you can save and view all of your walls.
First choose your wall colour and add distinguishing words to the end of your wall URL if you would like to personalise the wall. Click on the options of who is able to view or post notes. If you want to approve the posts click on the check box. Type in a title for your Wallwisher by clicking on Click here to edit title and do the same for the Subtitle.
Add an Icon Picture to the wall by clicking on Click to select image. Choose one from the ones provided or upload a picture from your own picture library by clicking on the Browse button. When you have finished click on the 'done' button in the bottom right hand of the screen. To add a note, double click on the wall, type in your note which is limited to 160 characters.
You can add links to a website or to a movie by pasting in the URL at the bottom of the note.
The notes can be moved around and organised. The notes can only be edited or deleted by the wall owner. If you have given a unique name to your wall, anybody can view and add to it http://www.wallwisher.com/wall/ineducation but in this case I am moderating the comments.
Hero Machine Version 2.5 is another Superhero site. This one is very comprehenisive and offers many choices. I particularly like how you can add a companion.
There is also four choices of bodies.
Once you have added all the parts and features to your superhero then you will need to take a screen capture Update 3 November 2009 Jeff the Designer left a comment about my post and told me that HeroMachine Version 3.0 is in Alpha mode, it looks amazing, heaps more options. Kids are going to have fun with this one!
The standard Animoto website allows you to make 30 second videos for free with about 12 items (photos or video clips). Add text over slides and spotlight the special slides. Add music by choosing tracks available from the Animoto library or upload from your own computer. Once the movie is generated it can be uploaded to Facebook, Twitter, or any social networking site, and it can be embedded in blogs and wikis.
Animoto for Educators allows more choices. Click on the Apply button to lodge an application for Animoto for Educators. Create longer videos and export to Youtube or download to your own computer.
PhotoPeach allows you to make slideshows out of photos, add captions to each slide, add music and then finally add a quiz to the end of the slideshow. Once the slideshow is finished, the viewers can leave a comment in the comment box. You need to sign up for an account first.
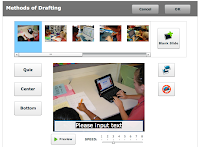
Step One: Upload photos Step Two: Arrange your images into the order you want to present them Step Three: Type in a title and choose your music. There is a choice of instrumental, classic, search YouTube or upload your own Step Four: Click Finish Step Five: Play the slideshow and add captions by clicking on Add caption Step Six: Type in the caption, choose where you want to place it 'Center or Bottom' Step Seven: Click on the next photo and add a caption, repeat with all of the photos
Step Eight: Finally, add a quiz by adding first a blank slide and then click on the Quiz button. Type in the Quiz. Complete the slideshow by clicking on OK at the top of the page.
There are several ways of sharing your slideshow. Email to friends, upload to Facebook, MySpace, add a link to Twitter, embed a copy into your wiki or blog or copy a link to the slideshow that could be inserted into PowerPoint,Word, Keynote, Pages, Zoho or Google Docs.
You can add voice by typing in some text and a computer generated voice will read it out, or record your own voice using the microphone. You can add backgrounds.
And you can publish to your blog or wiki. You can also send to an email address and a phone You will need to set up an account.

 One of the activities I timetable children to do each day before school is to find out what happened on this day in History. Some of the sites I had been using were American (and were the day before, because of time difference).