The standard Animoto website allows you to make 30 second videos for free with about 12 items (photos or video clips). Add text over slides and spotlight the special slides. Add music by choosing tracks available from the Animoto library or upload from your own computer. Once the movie is generated it can be uploaded to Facebook, Twitter, or any social networking site, and it can be embedded in blogs and wikis.
Animoto for Educators allows more choices. Click on the Apply button to lodge an application for Animoto for Educators. Create longer videos and export to Youtube or download to your own computer.
PhotoPeach allows you to make slideshows out of photos, add captions to each slide, add music and then finally add a quiz to the end of the slideshow. Once the slideshow is finished, the viewers can leave a comment in the comment box. You need to sign up for an account first.
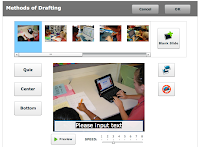
Step One: Upload photos Step Two: Arrange your images into the order you want to present them Step Three: Type in a title and choose your music. There is a choice of instrumental, classic, search YouTube or upload your own Step Four: Click Finish Step Five: Play the slideshow and add captions by clicking on Add caption Step Six: Type in the caption, choose where you want to place it 'Center or Bottom' Step Seven: Click on the next photo and add a caption, repeat with all of the photos
Step Eight: Finally, add a quiz by adding first a blank slide and then click on the Quiz button. Type in the Quiz. Complete the slideshow by clicking on OK at the top of the page.
There are several ways of sharing your slideshow. Email to friends, upload to Facebook, MySpace, add a link to Twitter, embed a copy into your wiki or blog or copy a link to the slideshow that could be inserted into PowerPoint,Word, Keynote, Pages, Zoho or Google Docs.
You can add voice by typing in some text and a computer generated voice will read it out, or record your own voice using the microphone. You can add backgrounds.
And you can publish to your blog or wiki. You can also send to an email address and a phone You will need to set up an account.
Following on from my blogpost about The Hero Factory, there is another Superhero site. Marvel has their own website for creating superheroes. Click Begin and then create your base.
Then go through all of the tabs to create your superhero.
To save the Superhero you need to set up an account or you can click Download and then take a screen capture.
When you show My Avatar Editor to children they recognise it straight away as it looks like the avatars (known as Mii) you can make on a Wii. It is very easy to use. Type in your name and creator name. Choose Gender, Choose colours. Then click on the buttons below to personalise your avatar. Once you have finished click on the the Save button (the first button)
There are several save options. I recommend using the Export option as that allows you save it as a Jpeg. You can also select the Pictures size and a background colour.
Where the Wild Things are is an old favourite book of mine and one that I have used with classes many times. The movie is due out on the 3 December 2009 (in NZ) which will renew interest in this old classic. A few years ago I developed some activities using the context of the book and integrated it into the maths we were doing at the time; tessellations and rotation. The skills students learned from working with shapes enabled them create their own Wild Things.
Teachers want to know ways to engage students in editing their own writing. If you have a projector, whiteboard (or even better an IWB) try this. Start off with Joe Davis's site http://www.telescopictext.com/ I ask students to describe what the tea could taste like, write some answers above the text, then click on the word 'tea'. New text will be inserted into the sentence.
We carry on in this mode predicting, describing and analysing the new edited text until we can go no further.
The next day we can look at this website which is based on Joe Davis's site http://basseq.com/fun/telescopictext/ Now we can add our own words by replacing the text that is already there by highlighting the word to be changed, click on Replace, type new word and then click on Submit changes.
The third day can then be spent looking at Tripticos Word Magnet site. Type in a sentence. When you type in the full stop make sure there is a space between it and the last word. Click Next.
In the next window you can choose from many different backgrounds but for my editing lesson I will keep to a blank page
Click on Done and the next page will appear with your text broken up into text boxes. Click and drag them up to make a sentence.
Now start adding new words by typing in the 'Add new magnet box', once you have clicked the + symbol, click on a colour to change the colour of your text box. Drag it into the correct place. Use the colour coding to identify adjectives, conjunctions etc.
This is a great way to get students interested in editing their work and to see how a sentence can come alive. These are the type of activities that I like to use with children as part of my modelling and teaching. This will work well with just a projector and computer, but the Interactive Whiteboard would allow students to take over the manipulation of text and objects. Smartboards 'Ink Aware' software allows you to edit in Word. So this activity could be carried on in Word, using the Smartboard software that will recognise your ink writing, turn it into text and insert into your sentence. This is demonstrated in the Youtube movie below
Teachers want to know ways to engage students in editing their own writing. If you have a projector, whiteboard (or even better an IWB) try this.
Start off with Joe Davis's site http://www.telescopictext.com/
I ask students to describe what the tea could taste like, write some answers above the text, then click on the word 'tea'. New text will be inserted into the sentence.
We carry on in this mode predicting, describing and analysing the new edited text until we can go no further.
The next day we can look at this website which is based on Joe Davis's site http://basseq.com/fun/telescopictext/
Now we can add our own words by replacing the text that is already there by highlighting the word to be changed, click on Replace, type new word and then click on Submit changes.
The third day can then be spent looking at Tripticos Word Magnet site.
Type in a sentence. When you type in the full stop make sure there is a space between it and the last word.
Click Next.
In the next window you can choose from many different backgrounds but for my editing lesson I will keep to a blank page
Click on Done and the next page will appear with your text broken up into text boxes. Click and drag them up to make a sentence.
Now start adding new words by typing in the 'Add new magnet box', once you have clicked the + symbol, click on a colour to change the colour of your text box. Drag it into the correct place. Use the colour coding to identify adjectives, conjunctions etc.
This is a great way to get students interested in editing their work and to see how a sentence can come alive. These are the type of activities that I like to use with children as part of my modelling and teaching.
This will work well with just a projector and computer, but the Interactive Whiteboard would allow students to take over the manipulation of text and objects.
Tagul is an interactive Word (Tag) cloud. Each word is linked to a website so it becomes a navigation tool for the viewer. How it is different from Wordle is
words are interactive, it is a tag cloud
you can have several different fonts
you can have the words in a shape
It can be time consuming as you have to go through every word to delete common words or words that you don't want to appear in the cloud. It is still very new and the developer 'Alex' has stated that there are more features to come. In this example I used my blogsite 'ICT Teaching and Learning' to generate the words for the Word cloud, all the words in the cloud point to Google but this can be tweaked to point to other websites. Once you have played around with it for a while it is quite easy to mix and match colours, fonts, shapes and backgrounds. It will be interesting to see how this application develops and how we could use it in education.

 The standard Animoto website allows you to make 30 second videos for free with about 12 items (photos or video clips). Add text over slides and spotlight the special slides. Add music by choosing tracks available from the Animoto library or upload from your own computer. Once the movie is generated it can be uploaded to Facebook, Twitter, or any social networking site, and it can be embedded in blogs and wikis.