Wednesday, 29 October 2008

The Reverse Key


Tony Ryan's 'Reverse Key' uses words such as cannot, never and would not e.g. list things you would never/cannot,would not see.
When you are planning a unit, include a Reverse key

  • Healthy food Unit: Name 10 things you would not put on a sandwich?
  • Earthquake: What are some of the things you cannot do in an earthquake?
  • Zoo: Name 10 zoo animals that cannot live in your house
  • Weather: what are 6 things you would not do in a storm
Or use this key as a reading activity
  • Charlotte's Web: List 10 things Charlotte would never do?
  • Where the Wild Things are: List 6 things that the Wild Things would not do?
  • Fairytales: What 5 things could Snow White/Cinderella/ Rapunzel never do?
These answers could be completed as a collaborative group activity, adding ideas to a mindmapping diagram (such as as Kidspiration or Inspiration, or online mindmapping software such as bubbl.us) .

Sunday, 26 October 2008

Zoho: Online Free Office Package

Zoho allows you to create WordProcessing documents, Slideshow Presentations, Spreadsheets, Databases, email, calendar, blog sites and more. And it is free. Which means if your students have internet connection at home but no suitable WordProcessing packages on their computer then they can use this suite of applications for their homework. Word, PowerPoint and Excel documents can be uploaded to Zoho, and vice versa you can download your Zoho documents into Word, PowerPoint or Excel or even in PDF file format.
There is a limit to what you can do regarding extra tools but the basics are there. You can insert photos, type text, insert tables, change fonts, size and colour, align text, print and save.


It also has an easy to use Database Creator so students could create their own surveys or databases

Thursday, 23 October 2008

Computer labs and Management

After observing countless lab lessons and taking a few myself, there are a few strategies I would suggest teachers put in place

  1. Control signals to get attention
  2. Repetition
  3. Organisation of sites and links

1. It is important that all students will stop when you make a certain signal. You would use this when you want to demonstrate the same thing to everybody. The signals could be a clapping pattern or a voice pattern such as "hands off...look at me'. For older students I tend to use "thank you...looking at me". Then you should stop and wait until all students are looking at you, if they don't I would say "Oh dear, not everybody is looking at me, let's try again..." The common mistake I see teachers make is that they continue to shout instructions to the class while they are all still talking. Once you gain a few students attention, make the comment "Well done Johnny, your eyes are on me..." etc and soon all the students will be looking your way. If it has taken a long time to get their attention, then I would say once they are all looking at me "That was a bit slow, let's try that again, turn back to your computers...hands off, looking at me". Believe it or not, this works! Kids will respond to what you want them to do if you have set the rules and if you keep the same rules and routines constant.

2. As stated before, repetition works. If you keep to the same constant routines of behaviour in the computer lab, all your lessons will go smoothly. SO, make sure the students know what the attention signals are. For more tips on successful computer lessons click on this link 'Going to the computer lab'

3. For younger children particularly, I like to have the links organised through a hyperlinked PowerPoint or Keynote. These links will lead to the Website, game or file I have saved on the network. Students will need to know where to find the file, so make that clear at the start of the lesson, and how to put PowerPoint into Slideshow so that the links work. For older children you could have Class Delicious site organised with all the links to the websites they need to visit, categorised under curriculum areas, topics, or even Group names.

Tuesday, 21 October 2008

Moblyng: Creating Photo Slideshows

Moblyng is free software that you can upload your photos to, organise them in many different formats, add music and titles if you wish and then embed the code into blogs or Wikis. I have used it here to showcase how some students I worked with recently took their own photographs after watching a slideshow I had made about 'How Kids can take great Photos'
You need to register first and set up an account before you can save the slideshow to get the embed code.

Sunday, 19 October 2008

Education version of Glogster

Glogster has been around for a while but now they do an education version. You can create school accounts and keep Glogs private. They will be adding more features as time goes by. You do need to make sure you have the latest versions of Adobe flash for everything to work well.
Its catch phrase is 'Poster Yourself!' Insert photos, graphics, text boxes, speech bubbles, podcasts, movies (Youtube, webcam), hyperlinks to other files and sounds so that it becomes interactive. This is wonderful way for children to present their work and publish it to a blog, wiki or website. So instead of making a poster displaying children's knowledge, get them to make an interactive poster that links to the places they found their research i.e. online encyclopedias, movies etc


Examples of how to use Glogster
  • book reports
  • book trailers (advertising a book in the same way a movie trailer advertises a movie)
  • character analysis (picture of a character and labels)
  • publishing their writing (recounts, explanations, argument etc)
  • Inquiry learning presentation on a topic
  • posters for health (all about me, how to keep safe)
  • science (steps of an experiment, findings from an experiment)
  • comparison statements, insert photos or graphics and make comparisons
  • insert a glog that has different elements hyperlinked into the home page of a Wiki so it becomes the 'launcher' page that links to other pages

Thursday, 16 October 2008

Keyboarding, projectors and PowerPoint


This is a PowerPoint slideshow that has different keyboard letters on each page. The first day you introduce this you would look at the home keys. Students will need to practice those for a couple of weeks. Once they have mastered the home keys then I would start introducing one letter at a time. Depending on how well the children have mastered the letter will decide when the next letter will be taught. These are drills that can be practiced when students come to the computer lab.

Oral Language and PowerPoint


A great activity for starting off the day is to timetable 3 children every morning to open up a PowerPoint that has links to

Those three children find something on those sites to report back to the rest of the class.


The next day three other children have a turn. I like the students to do this before school starts.

Handwriting, projectors and PowerPoint


I have prepared Handwriting examples for a class using the font Jarman. If you prepare all your handwriting lessons like this then you will always have them available. I have created them in PowerPoint. They can then be projected onto the screen for the children to copy out. Modelling how the letters are written can be done over the projection or on another whiteboard. I also like to have an individualised handwriting programme for my students so the separate PowerPoint slides can be printed out and laminated so you have class sets of the cards.

Wednesday, 15 October 2008

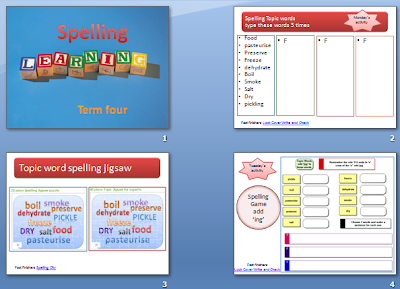
Spelling, PowerPoint and hyperlinking


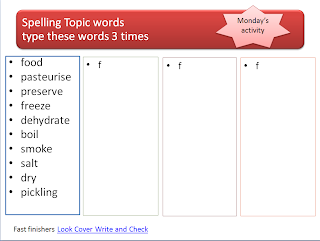
Create your week of spelling activities in PowerPoint. I like to use PowerPoint because I can hyperlink to websites and files on my computer. In this example I have listed the topic words for the week. Students who have access to the computers can type out this list 3 times and it is projected on the screen for the rest of the class to copy into their books. There is a hyperlink below that to a website called Look, Cover, Write and Check. You can type in your word list and be tested online. This is a great activity for fast finishers and for children who need some incentive to learn their words.
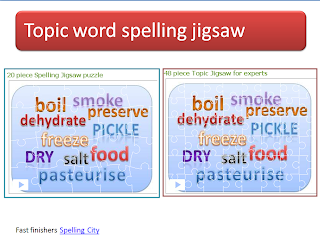
This next activity has been created in Jigzone. Upload a photo to Jigzone, set the number of pieces and save it. I created these images in PowerPoint by typing in all the words, rearranging them, inserting a shape behind them, grouping all the images and then right clicking to use the option 'Save as Picture'. Then I uploaded the image to Jigzone. I could then hyperlink the image I had made from PowerPoint to the jigsaw I had made.


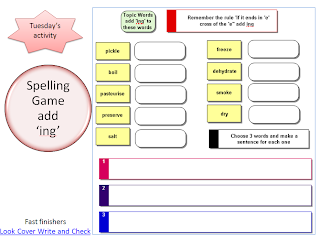
This activity has been created in Inspiration and has been saved as a file to my computer. So all I had to do was hyperlink to the file from PowerPoint.

Jigzone


I used to subscribe to the website Jigzone years ago, but it became too addictive. Especially if you have the jigsaws emailed to you everyday! But it is a great educational tool, all you have to do is upload a jpeg, choose how many pieces you want then embed into a blog, website or wiki...or hyperlink through PowerPoint to the link where your Jigzone has been saved.


This activity has been created in Jigzone. Upload a photo to Jigzone, set the number of pieces and save it. I created these images in PowerPoint by typing in all the words, rearranging them, inserting a shape behind them, grouping all the images and then right clicking to use the option 'Save as Picture'. Then I uploaded the image to Jigzone. I could then hyperlink the image I had made from PowerPoint to the jigsaw I had made.


This is a photo that a child took of another child playing on the Adventure Playground.


Click to Mix and Solve

Friday, 3 October 2008

Scribd - Presentation Software

Scribd is my new favourite online presentation tool. It is very simple to upload documents, and accepts many types of files (PowerPoint, Word, PDF and picture file formats jpeg etc). This is a wonderful way to showcase children's published work online as it embeds into Blogs and Wikis. Below is an example of a Word document.