Set up an account, upload animated PowerPoints with sounds, video, links, buttons and transitions to SlideBoom. Embed in blogs and wikis. Students will need to critique their PowerPoints before uploading, remind them that 'less is more' when adding effects to their slideshows.
Tuesday, 25 November 2008
Helping children to become better researchers
To teach children how to become  competent researchers requires several stages. I like to use Inspiration (or Kidspiration) Graphic Organisers to guide them in this task. Once they have some knowledge of the topic at hand teachers generally set them an activity where they have to come up with a question to research about. Most children find this difficult.
That is why I use this Graphic Organiser 'What do we know about?' Students fill in what they know about the topic. I then ask them to choose one of the ideas that they would like to know more about. They then choose one of the ideas and turn that into a question.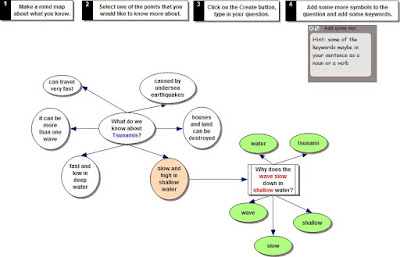
The nouns or verbs in the question are likely to be their search words.
The next step is to go to Google or any other search engine http://delicious.com/sharpjacqui/searchengines enter in the search words. Click on a website. Generally most of the websites they will choose will have a lot of text which can be quite daunting to read. This is when I introduce my trick of Ctrl F (Command - F for Macs). This brings up the 'Find' box,
type in one of the key words, if that word is on the page it will be highlighted, ask the child to read the sentence the word is highlighted in, refer them back to their research question and ask them if it answers their question, if not they click on the Next and that will highlight the next instance of that word, again they read that sentence. "Does it answer the research question?" If so the children highlight just that sentence, copy and paste into a Word document. They continue in this way until they have enough information that answers their research question.
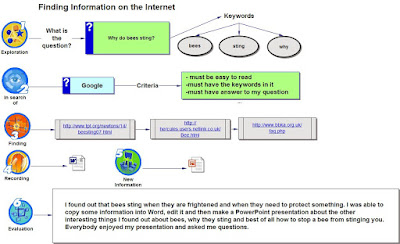 The next Graphic Organiser is the 'Finding Information on the Internet'.
Children type in
For this to work well and for students to become independent researchers this format needs to be repeated often. It can work well for novel studies, topic research, and as a starting point for several writing genres such as procedural, argument and explanation.
 competent researchers requires several stages. I like to use Inspiration (or Kidspiration) Graphic Organisers to guide them in this task. Once they have some knowledge of the topic at hand teachers generally set them an activity where they have to come up with a question to research about. Most children find this difficult.
That is why I use this Graphic Organiser 'What do we know about?' Students fill in what they know about the topic. I then ask them to choose one of the ideas that they would like to know more about. They then choose one of the ideas and turn that into a question.

The nouns or verbs in the question are likely to be their search words.
The next step is to go to Google or any other search engine http://delicious.com/sharpjacqui/searchengines enter in the search words. Click on a website. Generally most of the websites they will choose will have a lot of text which can be quite daunting to read. This is when I introduce my trick of Ctrl F (Command - F for Macs). This brings up the 'Find' box,

type in one of the key words, if that word is on the page it will be highlighted, ask the child to read the sentence the word is highlighted in, refer them back to their research question and ask them if it answers their question, if not they click on the Next and that will highlight the next instance of that word, again they read that sentence. "Does it answer the research question?" If so the children highlight just that sentence, copy and paste into a Word document. They continue in this way until they have enough information that answers their research question.
 The next Graphic Organiser is the 'Finding Information on the Internet'.
Children type in
- What the Question is
- What the keywords are
- the search engine they are going to use
- the criteria for the websites they will use
- the links to the websites
For this to work well and for students to become independent researchers this format needs to be repeated often. It can work well for novel studies, topic research, and as a starting point for several writing genres such as procedural, argument and explanation.
Labels:
graphic organiser,
Inspiration,
Kidspiration,
research
Wednesday, 19 November 2008
Make Beliefs Comix
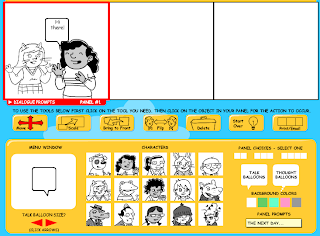
Create comics with characters, panel prompts and talk balloons MakebeliefsComix. Make 2, 3 or 4 page comics. You can't save or download the comics but you can Email or print (or take a screen capture and paste into Word or PowerPoint).
If you are taking a screen capture for showing in a PowerPoint then make sure that you only do a 2 page comic at a time, that way you will get a better image when you make it bigger on the screen.
Children from Hunua School went on class trip to the local Police Station. They presented the experience they had by creating comics in Make Beliefs Comix and then inserted the finished comics into PowerPoint.
Comic Life and Slideshows
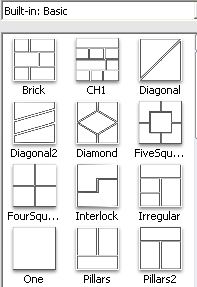
You can make slideshows of comic pages in comic life. Before you start turn the page to horizontal. Go to File - Page Format, click on Landscape.
If this Library is not showing then click on the drop down menu and select Built in basic.
Click on the 'One' template and drag and drop on the page.
Drag your Photo in and add your text bubbles, headings and narrative text.
Add more pages with either 'One' template or with a template that has 2 or 3 spaces on it.
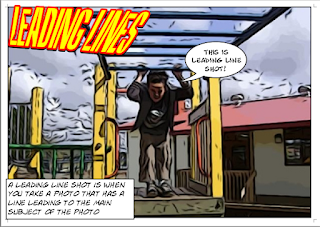 Once you have completed all your pages and saved them, then export them as individual jpegs. Go to File - Export - Export to Images.
The individual pages will be exported as separate jpegs.
These can now be imported into Photo Story, MovieMaker, Keynote or PowerPoint. Add music and you have a comic slideshow.
Labels:
Comic Life,
comics,
Keynote,
literacy,
Photo Story,
PowerPoint
Tuesday, 18 November 2008
Kidspiration, Word and Projectors
No Interactive Whiteboard or Internet access, what could she do?
I was in a class yesterday where the teacher was really keen to use her laptop and the school projector in her classroom teaching. I showed her how to set it up and we decided where was the best place to put it. Of course the projector is not suspended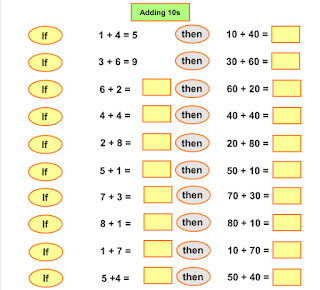 from the ceiling...it has to sit on a table, but we could work with that. And we had to use extension cords, so duct tape was used and new rule in the class imposed "Walk around the table rather then through the gaps!"
Next was the discussion of how to use this as a learning tool.
First of all we looked at the Kidspiration math activities that are available on the s chool server. These types of activities can be used as a teaching tool. Because we were projecting onto the whiteboard the children could go up and write the answers with whiteboard markers (which they love doing)and the teacher could also get children to come up and type in the answer.
And of course Kidspiration is a great authoring tool, very simple to create your ow n activities and if you are still using Version 1 or 2 then you must upgrade to Version 3 as it has a folder dedicated to great math activities that you can adjust to suit your class and a new view which gives you maths tools to create activities with.
So using the laptop and the projector for maths was easy... What about writing?
We talked about how she models her writing on the whiteboard in the class so I suggested that she use 'Microsoft Word' and the font Comic Sans with a large font size so that all children can see it.
It is a good idea while you are modeling the writing to turn off the capitilisation, (2007 go to Menu Button
 and select Word Options, click on Proofing, click on AutoCorrect Options, deselect Capitalise first letters of sentences, click OK) (2003, go to Tools, click on AutoCorrect Options, deselect Capitalise first letters of sentences, click OK)
Students can make corrections using white board markers. This is also a good opportunity to teach keyboarding editing skills, as you do the editing say what you are doing "I need to fix up a spelling mistake so I am going to take my mouse and click at the end of the word scool and I am pressing the Backspace key, now I am typing in the correct word". This is a common editing mistake I see children doing, instead of going and clicking on the word to correct it they will backspace a whole sentence , therefore wasting time as they have to type the sentence again. And of course this is great time to remind children what fingers they should be using, such as "What finger do I use to make a full stop?" Have a couple of old keyboards available so that children can pass them around and practice making the full stop with the ring finger on their right hand.
So even without Internet access there is still a lot of ways you can use a projector and a laptop!
I was in a class yesterday where the teacher was really keen to use her laptop and the school projector in her classroom teaching. I showed her how to set it up and we decided where was the best place to put it. Of course the projector is not suspended
 from the ceiling...it has to sit on a table, but we could work with that. And we had to use extension cords, so duct tape was used and new rule in the class imposed "Walk around the table rather then through the gaps!"
Next was the discussion of how to use this as a learning tool.
First of all we looked at the Kidspiration math activities that are available on the s
 chool server. These types of activities can be used as a teaching tool. Because we were projecting onto the whiteboard the children could go up and write the answers with whiteboard markers (which they love doing)and the teacher could also get children to come up and type in the answer.
And of course Kidspiration is a great authoring tool, very simple to create your ow
 n activities and if you are still using Version 1 or 2 then you must upgrade to Version 3 as it has a folder dedicated to great math activities that you can adjust to suit your class and a new view which gives you maths tools to create activities with.
So using the laptop and the projector for maths was easy... What about writing?
We talked about how she models her writing on the whiteboard in the class so I suggested that she use 'Microsoft Word' and the font Comic Sans with a large font size so that all children can see it.
It is a good idea
 while you are modeling the writing to turn off the capitilisation, (2007 go to Menu Button
 and select Word Options, click on Proofing, click on AutoCorrect Options, deselect Capitalise first letters of sentences, click OK) (2003, go to Tools, click on AutoCorrect Options, deselect Capitalise first letters of sentences, click OK)
Students can make corrections using white board markers. This is also a good opportunity to teach keyboarding editing skills, as you do the editing say what you are doing "I need to fix up a spelling mistake so I am going to take my mouse and click at the end of the word scool and I am pressing the Backspace key, now I am typing in the correct word". This is a common editing mistake I see children doing, instead of going and clicking on the word to correct it they will backspace a whole sentence , therefore wasting time as they have to type the sentence again. And of course this is great time to remind children what fingers they should be using, such as "What finger do I use to make a full stop?" Have a couple of old keyboards available so that children can pass them around and practice making the full stop with the ring finger on their right hand.
So even without Internet access there is still a lot of ways you can use a projector and a laptop!
Friday, 14 November 2008
The Magic Line: Keyboarding Tip
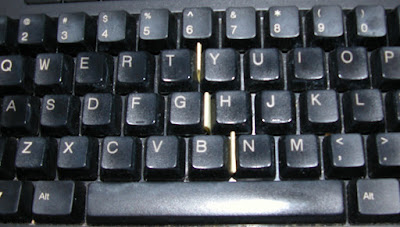
Teachers of younger children often ask me how can small children learn how to type. I believe it is never too early to start keyboarding with children. Of course they can’t reach all of the letters because of their handspan and I certainly don’t expect them to be touch typing by six years old, but there are early strategies that can be put in place. Number one is getting children to use 2 hands on the keyboard. This is where the magic line comes in. I fold small pieces of paper and stick them between the T and Y, G and H, and the B and N. I call it the magic line and that means that the right hand never crosses over the magic line to the left hand side of the keyboard and vice versa. This also works well with older students who are still hunting and pecking.
Monday, 10 November 2008
Keyboarding Practice Cards
In addition to my last post on Keyboarding and Projectors, here is a PDF file of all the cards.
Keyboarding Practice
Keyboarding Practice
Keyboarding Practice
View more presentations from Jacqui Sharp.
Friday, 7 November 2008
The 'What if?' key
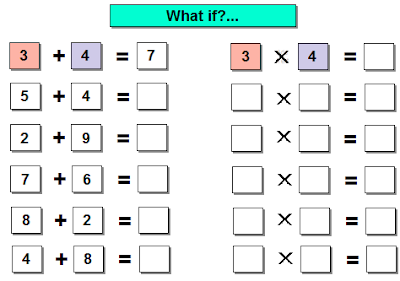
This must be one of the most versatile 'Thinkers' key. This question can be asked in any topic or curriculum area
Maths:
What if we changed the operation from + to x?

What if we added an oval shape to our angular tessellation?
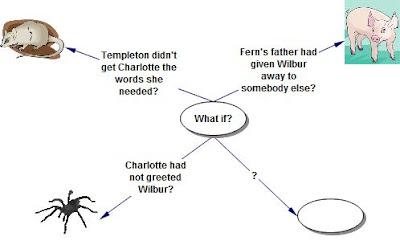
Reading:
What if statements challenging or offering a different path to the way the story went

Writing:
Argument Writing:
After writing the supporting points and examples, challenge these statements with What if questions.
Topic Studies:

The What if Thinker key should be used extensively in Topic Studies as it leads the learner into challenging situations.
Wednesday, 5 November 2008
Recount Writing
Following on from the last post about Explanation writing here are my versions of Recount Writing for Seniors and Juniors
Recount Presentation
Junior Recount
Recount Presentation
Junior Recount
Junior recount powerpoint 2003 version
View more presentations from Jacqui Sharp.
Recount presentation
View more presentations from Jacqui Sharp.
Labels:
Inspiration,
juniors,
Kidspiration,
literacy,
Recount writing,
Writing
Explanation Writing
When I start a new genre of writing I like to introduce it by preparing a PowerPoint that goes through all the steps of writing. For at least 2 weeks I would start my writing session with this presentation. Everyday we would start off our writing with this PowerPoint and we would concentrate on a different aspect each day i.e. Day Two...look at introductions (go over Present Tense) Day three...points in order.  The PowerPoint would also be printed out so that children can refer to all of it at anytime. I like to have hyperlinked games incorporated into the presentation that can be played as part of the lesson, and children have access to these through a PowerPoint that is available on their computers .
I also design a framework that children can use on the computer or as a print out. Here is an example of one made in Kidspiration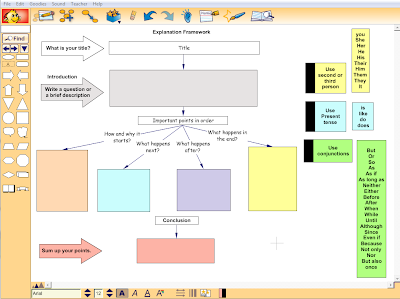 and here it is in Inspiration
 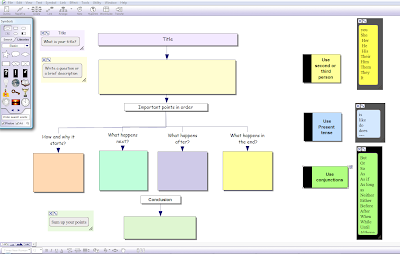 The more fluent the writer would depend how long they would spend on this framework. I would expect fluent writers to spend at least 2 to 3 days reworking and editing their writing.
 The PowerPoint would also be printed out so that children can refer to all of it at anytime. I like to have hyperlinked games incorporated into the presentation that can be played as part of the lesson, and children have access to these through a PowerPoint that is available on their computers .
 I also design a framework that children can use on the computer or as a print out. Here is an example of one made in Kidspiration
 and here it is in Inspiration
  The more fluent the writer would depend how long they would spend on this framework. I would expect fluent writers to spend at least 2 to 3 days reworking and editing their writing.
How to write Excellent Explanations
View more presentations from Jacqui Sharp.
Labels:
Explanation writing,
juniors,
literacy,
PowerPoint,
Writing
Subscribe to:
Comments (Atom)
