The most obvious way is to print it out, but for most classrooms in our school that is not always a practical solution...
One: because the Printer does not always behave itself as it should
Two: it's always running out of paper and nobody replaces it
Three: we want colour and it is not a colour printer
Four: somebody pressed 'Print' a few times and now we have several copies
Five: we are reducing our carbon footprint
The next solution that teachers try is getting the kids to save it to their own folders. That could work!...depending on where the folders are. If they are on one central computer, then it is not too difficult to retrieve their work (if they save to their own folder!) This will only work if 'you' the teacher 'teaches' them how to save to their own folder. One of the most common professional development acts I have to do is 'teach teachers how to save to folders', understanding how to navigate to where items are saved is one of the most fundamental actions of successful computer use. If you have a projector in your classroom then demonstrate it regularly, don't assum
 e that students know how to do it. I always 'talk' my way through the actions I am performing so that they can see what I am doing, while I am performing that action.
"Now I am going to save this file by going to File-Save, I look at the top here to see where I am saving, is that the folder I want to save in? No, then I need to click on My Documents here, then double click on my folder here, what does it say at the top of my dialogue box? Am I in the right place? OK, click Save."
But the next problem we come to that is quite time consuming is going into every student's folder to retrieve the work they have completed. So this is when you need to teach the children 'How to manage themselves'.
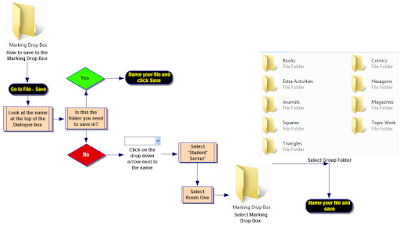
Step One: Create a folder on the main computer used or if there are more than one, create a folder on the Server in the Student Disk
Step Two: Call it 'Marking Drop Box'
Step Three: if you are expecting a lot of marking, then make sub folders in this folder in either Curriculum areas or group names
Step Four: Train your students how to save to this Marking Drop Box
Step Five: Train your students how to retrieve their marked work from Drop box and place back into their own folders
For the teacher this is much more manageable. You are able to go to one place to view and mark student work, and if you are the teacher that prefers to do marking at home, then copy the folder to your laptop.
This will only work if the students and teacher are trained to follow the procedures. Make up a Step by Step guide to saving and retrieving.


2 comments:
Great practical tips here as always. I would add the use of Google Docs to the list of ways to manage marking. If the kids are either working directly on work in a Google Doc or they upload it afterwards, then they can share it with the teacher's email address as a way for the teacher to access their work. Only applicable, of course, if kids have Google accounts and I know that there is an age barrier for that.
Thanks Suzie, yes both Google Docs and Zoho are great for that, and I talk about those in my http://jacquisharp.blogspot.com 'Web2.0 and Education blog.
This blog post suits those teachers that are comfortable with the Applications they use everyday and aren't quite ready to take responsibility for their students to work, publish and email online. The reason I wrote this blog post is because I had a secondary teacher ask me how could you possibly keep up with marking digital work...she couldn't quite see how it would take the place of students written work in books :-)
My favourite saying is 'Do it instead of...not as well as' and a lot of teachers are finding that hard to do!
Post a Comment