Thursday, 14 June 2012

PowerPoint motivating writing tip

Find a photograph background and then insert into a blank PowerPoint page. In this example one of my schools are studying dinosaurs and paleontology, so I suggested taking photos of the field or playground.


Then go to Insert - Clipart and select clipart that has white backgrounds. If you have white background appear on your graphic you will have to make it transparent by clicking on 'Remove Background' in the Format menu.


Click on the Home button and choose speech bubbles from the Insert Shapes menu.


To add writing lines click where it says 'Click to Add Notes' which is just below your main screen. Hold down your Shift key and minus - key on the keyboard. This will make lines. Once you have made several lines, press Ctrl A (Command A for Mac) to highlight all of the lines. Change the font size to about 36. Don't worry if you see no change yet.


Go to File - Print
Click on Full Page slides and change to Notes.
Check to see if your lines are the right width.
Print.


Students can now use this as a motivator for their drafting and editing. You could print out another copy in colour and use that as the final publishing.

For younger students you could make a PowerPoint template with the photo background embedded in the Master page. Go to View - Master - Slide Master, insert a background photo in the usual way and delete the slide master frames that show up, click on Close or Close Master.
Then save as a template by going to File - Save As, select PowerPoint Template under the Format dropdown menu, name it and click Save.

Wednesday, 13 June 2012

Google Drive Hint #1

In the old version of Google Docs, you saw all your files in the main window and the default setting would show all the docs that had been changed at the top of the list.
If you  have changed over to Google Drive you might be wondering where all your docs have gone!


My Drive
This is where all the files are that you have made
Shared with me
This is where all the files are that have been shared with you (but you can move them to 'My Drive' by selecting the file in the check box and clicking on 'Add to my Drive')
Starred
Stores the files that you have starred
Recent
Finds everything you recently opened or edited

Tuesday, 12 June 2012

Photo and Text apps #1

There are many different types of photo apps available.
This is a first of a series of posts I will make on photo apps.
In this post I will be looking at apps that allow students to quickly present their photos with writing.

Halftone: (iPad and iPod Touch)
Add Effects: Yes
Text:  Speech bubbles, narrative boxes
Share: as a photo to library, send in an email

  1. Take a photo or use a photo from the Library
  2. Choose a paper style and layout
  3. Add balloons and stamps
  4. Select a font
 How could you use this in the classroom?
  • Great for students who only write a few sentences

 Comic Life (iPad only)
Add Effects: No but great variety of templates to choose from
Text: Speech bubbles, narrative boxes
Share: Dropbox, WebDAV, email, Photo Library


  1. Create drawings in apps such as...
  2. Choose a template in Comic Life
  3. Insert graphics or photos
  4. Add text to speech bubbles and text boxes
  5. Add more pages, add templates that are different in the number of slides that they display
How could you use this in the classroom?
  • break up narratives and tell the story in different shapes and parts of the page
  • use a mixture of photos and drawings
  • choose templates that complement the telling of the story
  • use one photo templates for students who cannot write a great amount
  • create timelines
  • character or plot analysis
  • Procedural writing
  • posters
  • digital story writing

     Comic Touch: Free version has a watermark, has all other features of the Full version (iPhone version, no full iPad version)
    Add Effects: Limited effects of Smudge, Bulge, Dent,  Stretch or light
    Text: Speech, Thought, Whisper, Exclaim and Caption bubbles
    Share: Photo Library, email


    1. Choose a photo from the photo library or take a photo with the camera
    2. Add Speech, Thought, Whisper, Exclaim and Caption bubbles
    3. Tap on the Share button and save to Photo Library or email

    How could you use this in the classroom?
    • Use the photos as motivation for the writing, what are the students saying to each other
    • record what people could be thinking
    • great publishing tool for limited writing

    Google Docs and Webcam

    A fun addition to Google Docs is the 'Webcam' Picture. You can insert 'webcam' stills.

    • Go to Insert Image 
    • Click on Take a snapshot
    • Click on Allow
    • Click on Take a Photo
    • Click on Take Snapshot
    • Click on Select
    • Resize and move around

    How could students use this feature?
    • take photos of themselves
    • take photos of artwork or models they have produced
    • take photos of a group of students

      Monday, 11 June 2012

      Photo apps and effects #1

      Some photo apps can be purely gimmicky, but they can also have their uses in education. This is the first post in a series of Photo apps and effects.

      My Sketch (iPad and iPod Touch)
      Add Effects: Smudge, Contrast, Photocopy, Colour, Sepia, Smooth, Canvas, Classic, Fine Pencil, Sketchbook, Pastel and many others
      Share: Saves to Photo Library, or share to email


      1. Take a photo or use one from the library
      2. Choose an effect from below, if you don't like it, tap the back button
      3. Play with the brightness and contrast and any other editing tools that might appear
      4. Tap Save, choose image size
      5. Tap on Save to photo library or send in an email
      How could you use this in education?

      This app will provide you with lots of different ways to sketch. Children can take photos of the subject and apply the sketching filters to it. Then they can look closely it at and observe the form, shape, shadows and how the strokes have been applied. This will help them for when they attempt their own sketching on paper.

        Reference Tool

        This is an extremely useful tool for students, especially for those who get easily distracted when researching on Google.

        This is best used when you need to
        1. look for websites
        2. look for pictures
        3. reference a website
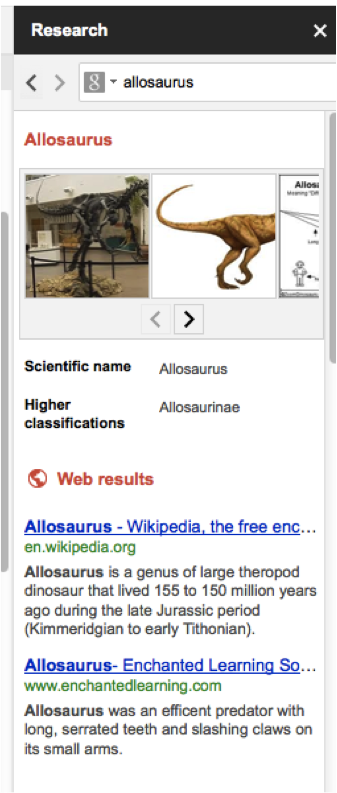
        While you are in a Google Doc go to Tools - Research. Type in a search term and the results will appear.
        Click on the arrows to see the graphics, drag and drop the picture you want to use onto the page.
        When you 'hover' your mouse over a web link, 3 buttons will appear.


        Click on 'Preview' to see a preview of the website. This is useful because at a glance you can see what the website looks like i.e. lots or very little text, few or too many graphics. This will help influence student's decisions on whether to look at the website or not.
        The 'Insert link'  will insert your search term hyperlinked to the website you are looking at.
        The 'Cite' will insert a footnote with a full citation for the website.

        Wednesday, 6 June 2012

        Music and Devices in the Classroom

        In one of my first classroom teaching experiences using iPods with students, I found a way to use them that I did not expect. I was not prepared for students overwhelming interest in the music side of the iPod.

        external image Copy+of+013+%282%29.JPGBy the second day students were asking me if they could play music before school using the battery operated (or power) speaker system. So every morning they would set up the iPod touch on the speaker system and play music until the bell went, and then they would switch off the music and start their day's work.

        On the third day I noticed one of the students had a particularly great singing voice, so I showed her the iKaraoke (US$19.95). We hooked it up to the speaker system and iPod, and she was away, so every morning as well as the music we were being serenaded with other students making 'requests' for songs that she would sing.

        But one particular use I noticed that sneaked in was students listening to music while they worked. In this photo, the student has just removed the head set to talk to me but he had been working away quietly listening to music.

        external image Copy+of+056.JPG
        What was interesting was that I noticed that the children who voluntarily used the iPods for music were the mostly 'rambunctious' lot who had the loudest voices, and were the 'ones' that you noticed the most in the class. But when they were listening to the iPods, there was a noticeable silence.
        These students were on task, doing their work and not bothering anybody else. I had no problem with them listening to music as they worked as that is something I like to do.
        So think about using your iPods playing music when students are working in their books, particularly for those students who are easily distracted.

        Tuesday, 5 June 2012

        Notes

        The Notes app comes pre-installed on your iPad or iPod Touch.
        The first line of your note becomes the title.

        It has very basic capabilities but still very useful.

        So how can it be used in an educational context?

        If you don't have a Word Processor on your iPad or iPod Touch then you can use 'Notes' for drafting a story. I have had students use the iPod touch very successfully for drafting their writing.
        It can then be sent as an email for printing out to be edited or opened in the Word Processing programme on your computer. (Tip: before printing out, set the Line Spacing to at least 2.0 in your WordProcessor so there is space for editing.)
        It can also be used as a basic publishing tool. If students have drafted, edited and conferenced their writing in their book, then they can type it up onto the Notes app and then email it for printing out. It can then be decorated or illustrated by hand.

        This app is great on field trips as well. Use it for writing notes.

        I have had students practise their spelling words on it, much more fun then writing them out in their spelling books.

        The notes app has a great search function on it. Type in a word and it will show all notes with that word in it. Great for finding notes on a common theme.

         No Distractions
        What is great about using Notes in these different ways is that students can't get distracted with other tools like changing fonts and styles and adding graphics and backgrounds.

        All they can do is 'write'!

        Tuesday, 29 May 2012

        Change the Default Page size of a Doc

        Change the default margins on Google Docs 'permanently'


        Open a Doc
        Go to File- Page Setup
        Change the margins
        Change the Page Type
        Click on Set as Default

        Friday, 25 May 2012

        ShowMe Interactive Whiteboard (Maths)

        The free 'ShowMe Interactive Whiteboard' app would have to be one of the most useful apps in the classroom for both teachers and students.

        When I am demonstrating it to teachers I get them to show me a maths strategy they are teaching their students at the moment.


        They record their voices talking through the strategy and draw it on ShowMe's Whiteboard.
        The final 'ShowMe' can be uploaded to http://www.showme.com where you can then get the 'embed' code to embed into your wiki, blog or site for students to revisit.


        Once the strategy is taught to the students they can then be set similar problems to solve.
        They can record their voices explaining how they solved the problems as they write the solution. These can then be shown to the rest of the group or to the teacher. These could be assessment examples that students can add to e-Portfolios.

        Have a look at this example from Russell Street School in Palmerston North

        Thursday, 24 May 2012

        Classroom Walkthrough 2012

        On Saturday 19th of May several teachers met at Waiuku Primary School to listen and share with other teachers what their classrooms look like and how they have changed their teaching practice. Rachel Boyd (@rachelboyd) was our host at Waiuku. They have made the decision in their junior school to use 32" TV screens as their computer screens for the students.

        They have bright coloured tables of different shapes spread around the room.


        Rachel has made particular good use of an old TV/DVD set where she has made a watching space for her students. They can watch educational videos on phonics and stories.


        The next school to visit was Hingaia Peninsula School, a newly built school that has just opened this year. The principal Jane Danielson (@janedanielson) talked about how their rooms are called studios with multi-functional nooks (the watering hole, the camp fire, the cave). There is an interesting mixture of furniture with tables of all heights and sizes and chairs to match. Three teachers work together in this space sharing the teaching of all of the children in the studio.


        Then we visited The Gardens in Manurewa. There are 3 e-Learning classrooms. Christine Hansen showed us the three rooms ranging from Year 5 to Yr 8. They have replaced all of their desks with different shaped tables and chairs. They have incorporated spaces into their classroom layout. All children have an iPad and there are 10-15 laptops in each classroom. Google Docs are used extensively by teachers and students.
        This photo was taken a few weeks ago.

        We then went to Point View, where Lynne Laburn (@llaburn) showed us around 2 junior classes and one senior.
        Lynne has her children for the second year in a row and likes to have a themed classroom. Last year it was the Secret Garden and this Year it is Pirates.
        Her year 2 students blog regularly and are also part of Quad blogging.
        She has lots of spaces and students are allowed to work wherever they like. They are very independent and self managing.

        Ksensia skyped in and as we viewed her class she pointed out all of the features. She has several spaces where students can go to be by themselves or with a partner.
        Recently she turned her classroom into the trenches of WW1 for a week!

        Finally we ended up at Dave Beehre's Year 8 class. He is famous for his 'Class without Walls' approach to teaching.
        Even though he has more desks in his class this year (student choice) his room is not like a traditional style Intermediate class. He has several comfy couches and beanbags scattered around the classroom. The students are not expected to sit in one place, they can sit anywhere in the classroom. Dave is well known for his wikis and he talked about how well Hapara (Teacher dashboard for Google) was working in his classrom.

        This was a great opportunity for teachers to talk about what they are doing in the classroom and for other teachers to listen and see what it looks like.